Introduction
Horizon is a modern Vision ePOS (electronic point of sale) software product providing till functionality designed to be used in a shop/stall environment.
...
The software is directly integrated with our order processing / stock management application ‘Commerce’, so products and stocks stored in Commerce are automatically available in Horizon, and sales made in Horizon are automatically posted to Commerce, eliminating the need to enter the same information into multiple systems.
| Table of Contents |
|---|
| title | Installation |
|---|
Installation
Hardware provided by us will come preinstalled and configured.

When first opening the application you will be asked to log in using your Vision Live credentials (these are the credentials which Commerce users use to first log in to the Vision Suite Launcher). These may be generic credentials used among all users in your company, or a specific user’s credentials. Enter them and click ‘Retrieve Settings’ to connect to your system.
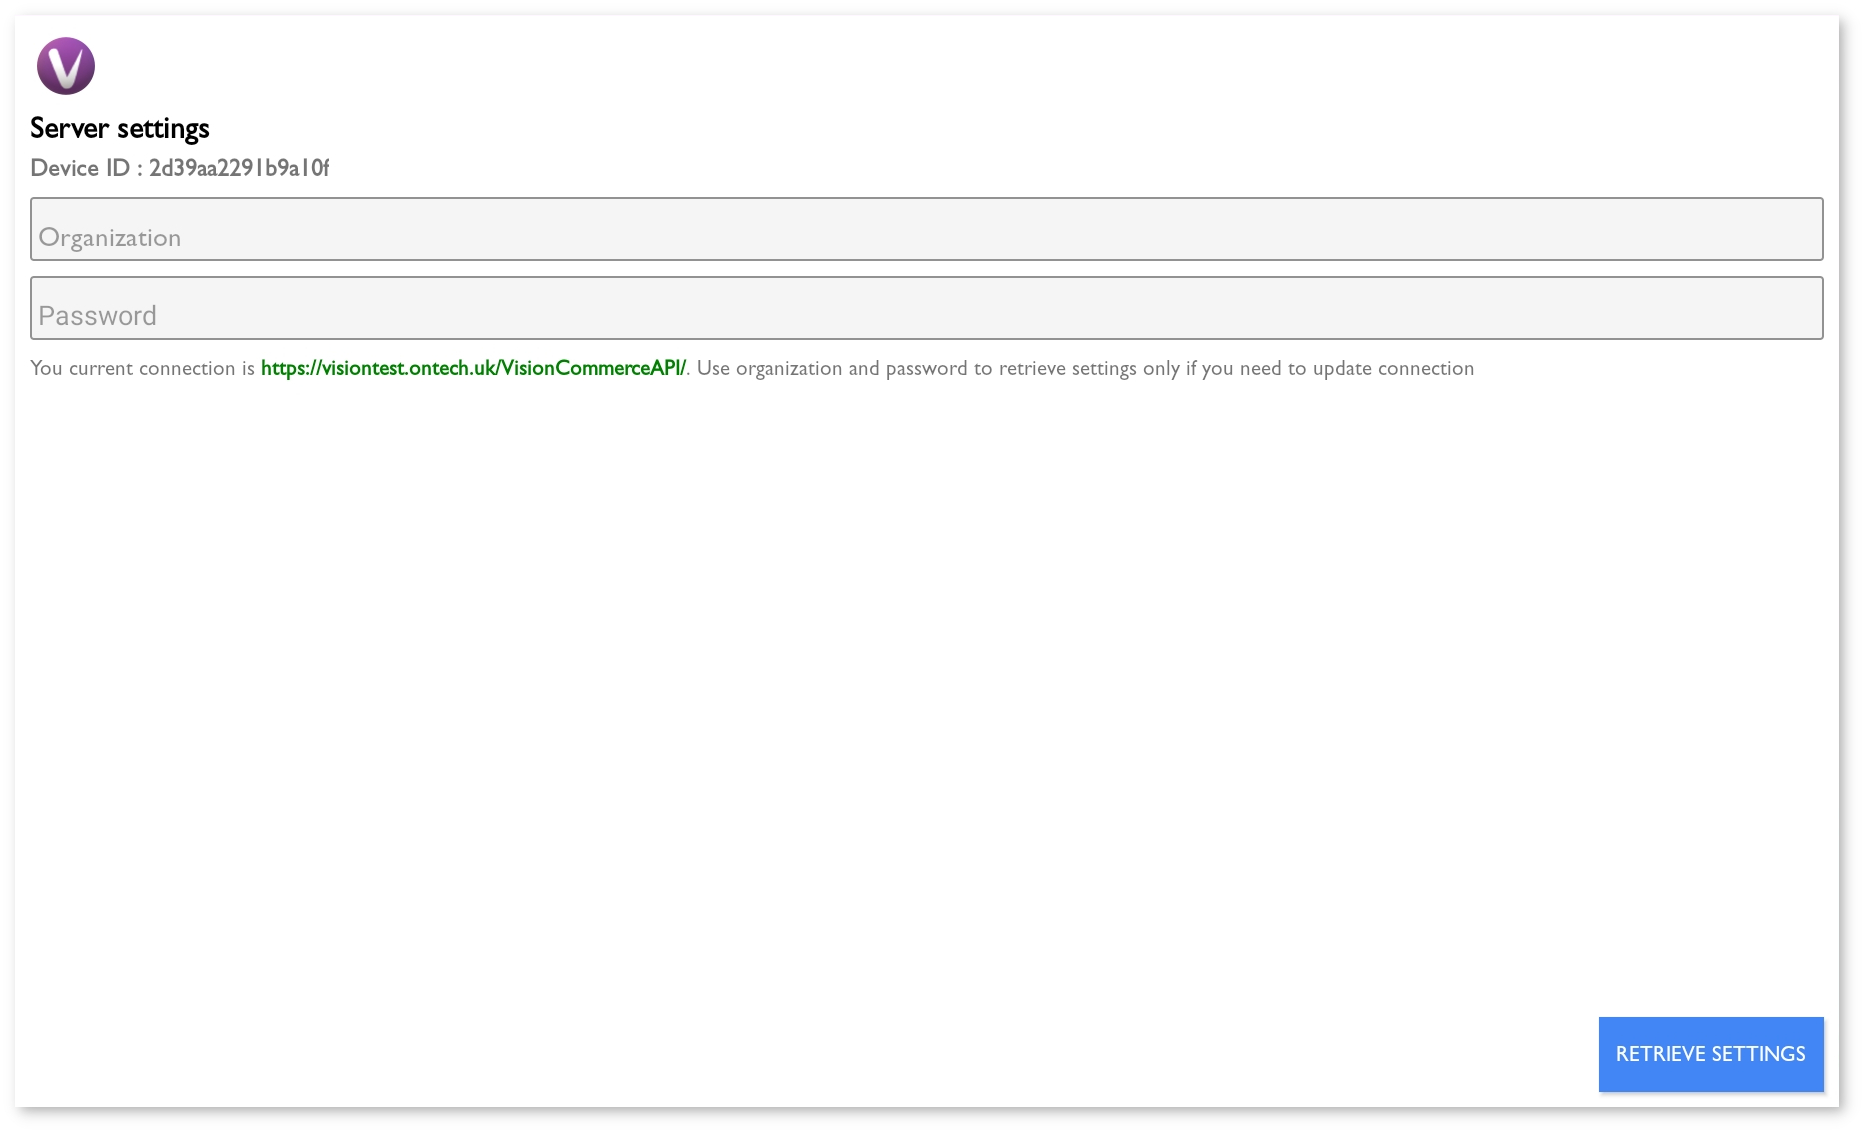
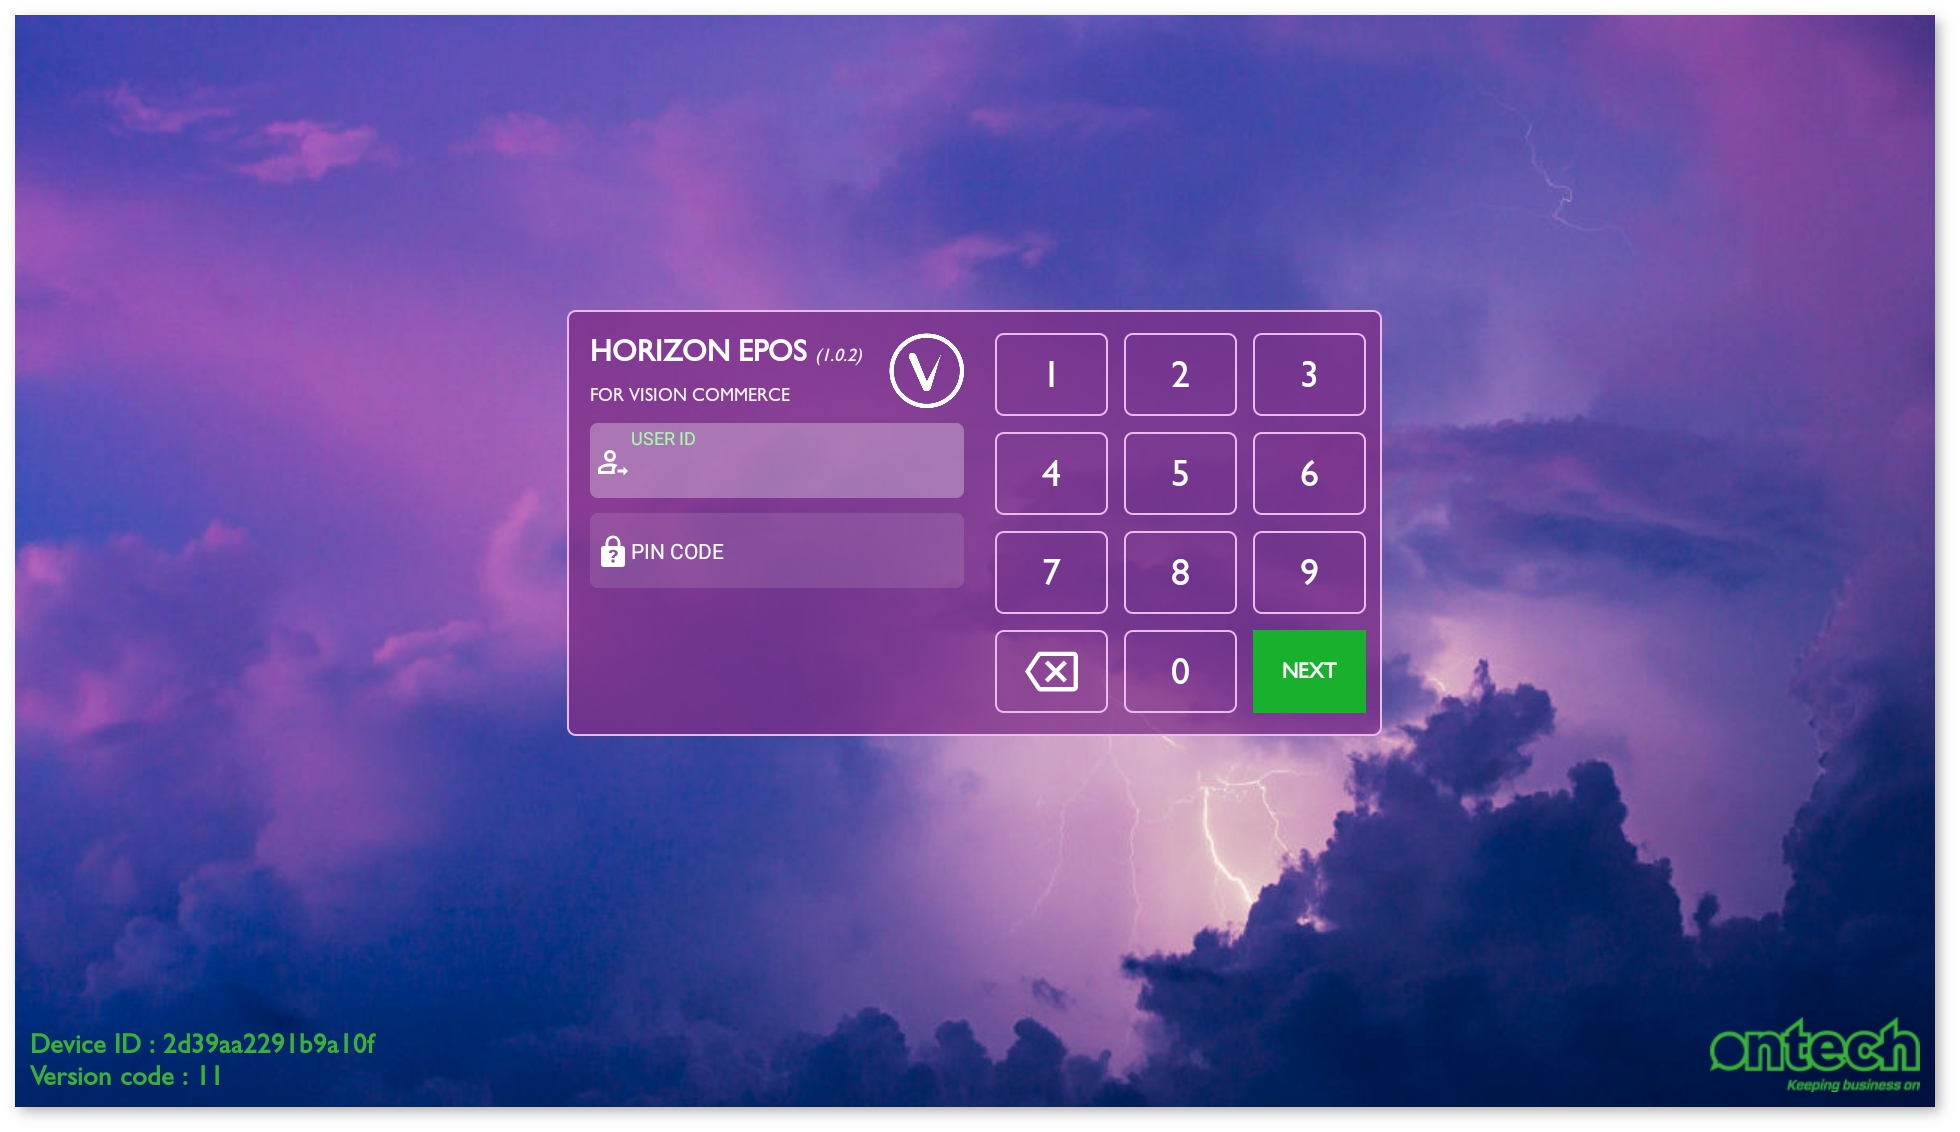
Once connected you’ll be presented with the login screen with your unique ‘Device ID’ displayed.
User / device access & configuration
In order to login you must first permit your device access to your Commerce system and create a Horizon user in: https://visionsoftware.atlassian.net/wiki/spaces/VC/pages/569311303/Frequently+Used#Access-Management.
User setup
Field
Notes
User ID
A unique number to identify the user. Every user should have their own User ID setup.
PIN
A numeric PIN to authenticate the user.
Language
Horizon supports multiple language, if your language is not listed please contact our support team to get it included.
Active
If the user account is active or not. Users cannot be deleted so untick to deactivate an account.
Manager
Managers are allowed to access the Horizon settings screen where sales info can also be retrieved.
Alt Stock
Select one of the ‘Alternate Stock Warehouse’ options from the grid at the bottom of the screen to allow the user (when making sales) to check stock levels in warehouses other than their shop. Can be left empty.
Device setup
Field
Notes
Friendly Name
An easier way to identify the device than the Device ID, i.e. London shop, cashier 1
Device ID
The Device ID is shown on the Horizon login screen. All devices must be registered in Commerce before they can be logged into in Horizon.
Expiry Date
The Horizon device will be permitted to login up to this date.
Alternate Stock Warehouses
Provides the ability to check available stock in warehouses other than the shop and purchase those items which then generates the Commerce order(s) to:
Arrange the stock to come to the shop
Deliver the stock direct to the customer from the warehouse
Deliver the shop stock along with the warehouse stock
Payment would be taken at the point of sale prior to the orders being sent, Commerce orders would then be generated to obtain the rest of the order.
For example if you wish to use the first option (arrange the stock to come to the shop), and you have 3x shops in Paris, enter ‘Paris shops’ as the description and setup the Paris shops in Warehouse1, 2 & 3, finally in the user grid above, set ‘Alt Stock’ to ‘Paris shops’ for the users to which it would apply.
| title | Settings |
|---|
Settings
The first time you login you’ll be directed to the settings screen as it’s imperative to set the options (especially in the ‘Config’ tab) before using the software.
Settings can also be accessed from the button in the sales screen:
Sales
This tab is used after sales have been made, it lists the totals for each of the payment methods used.
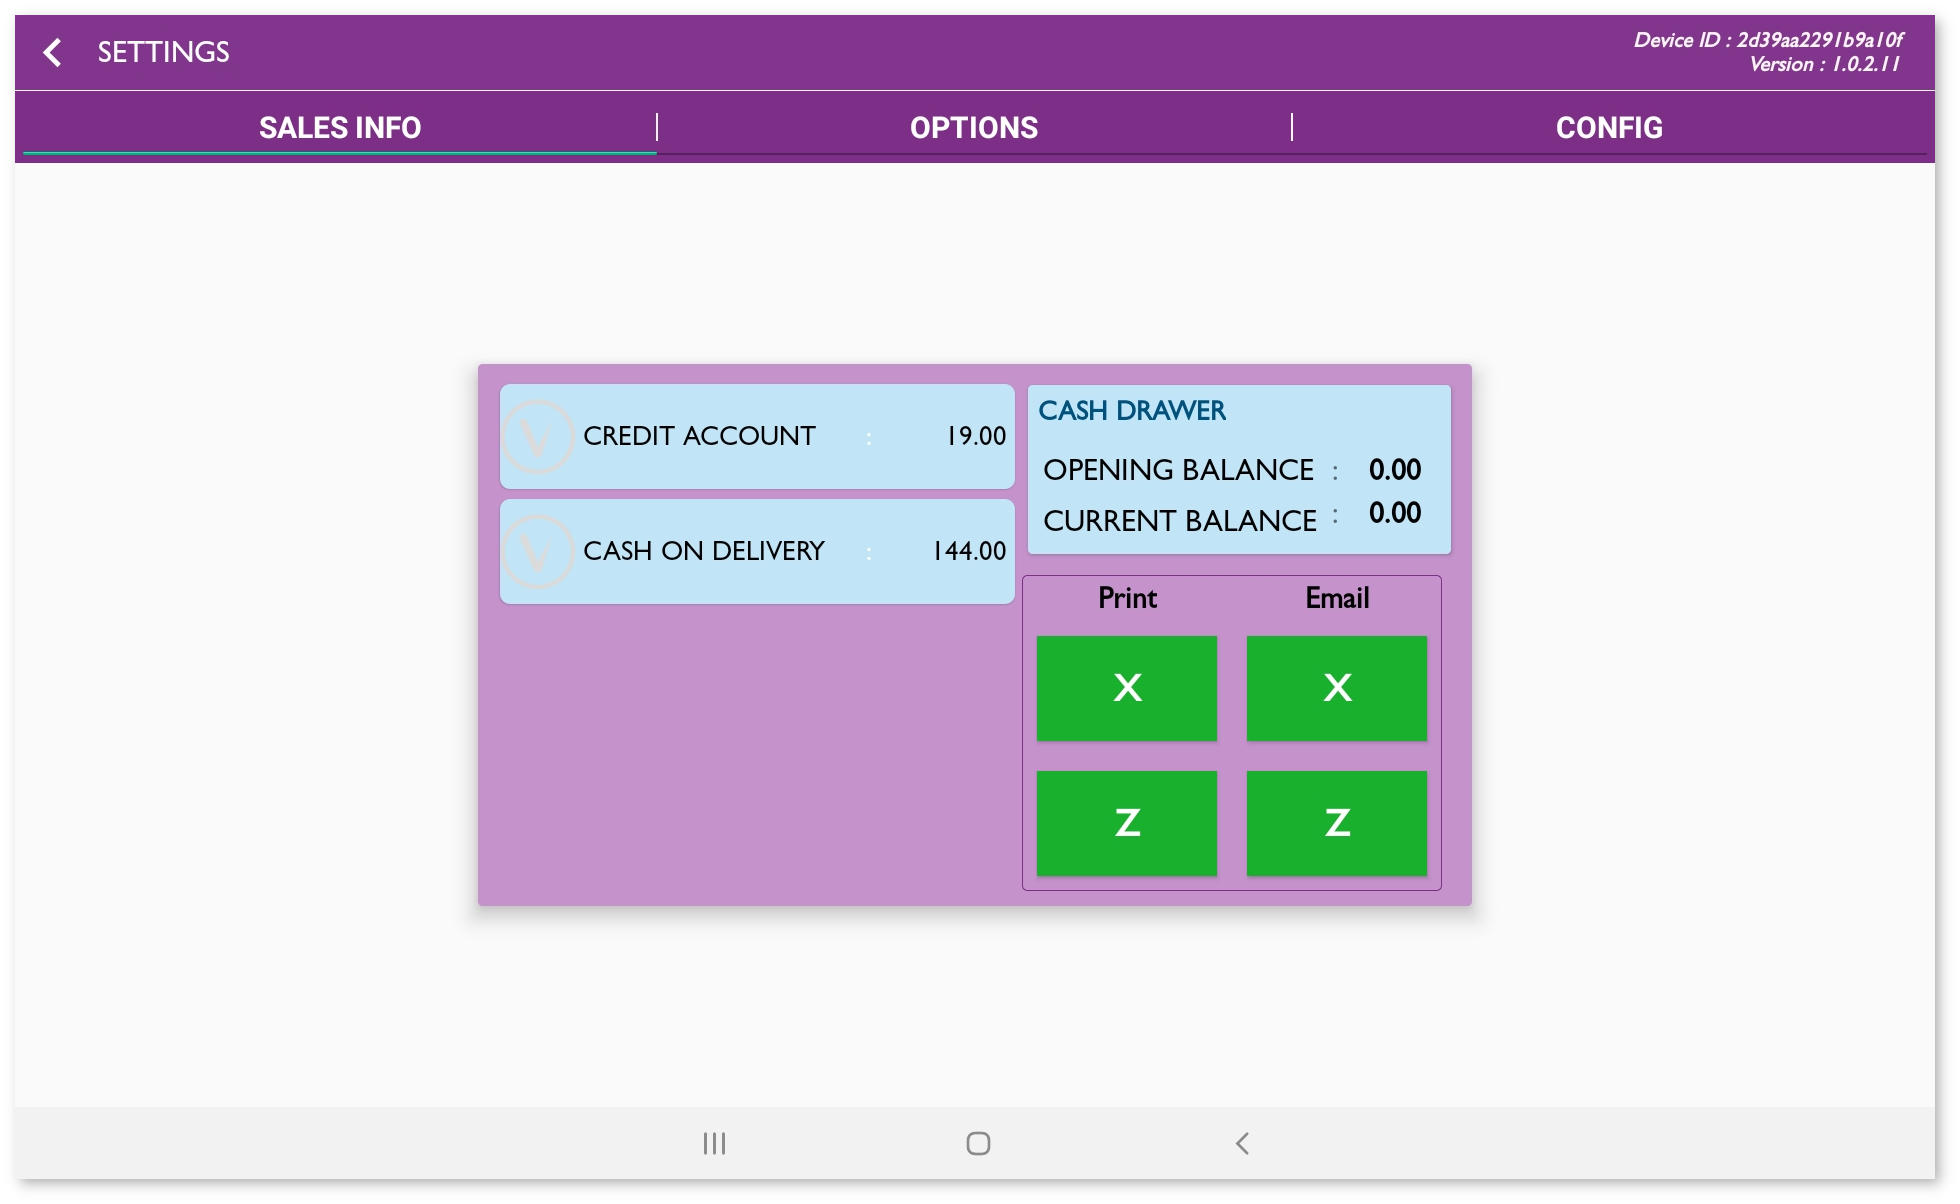
X/Z read
X outputs this summary to a report (printed / emailed)
Z outputs the summary to a report (printed / emailed) and clears those transactions to not output them again. This is usually run at the end of the day to record the totals taken for the day.
Report output example:
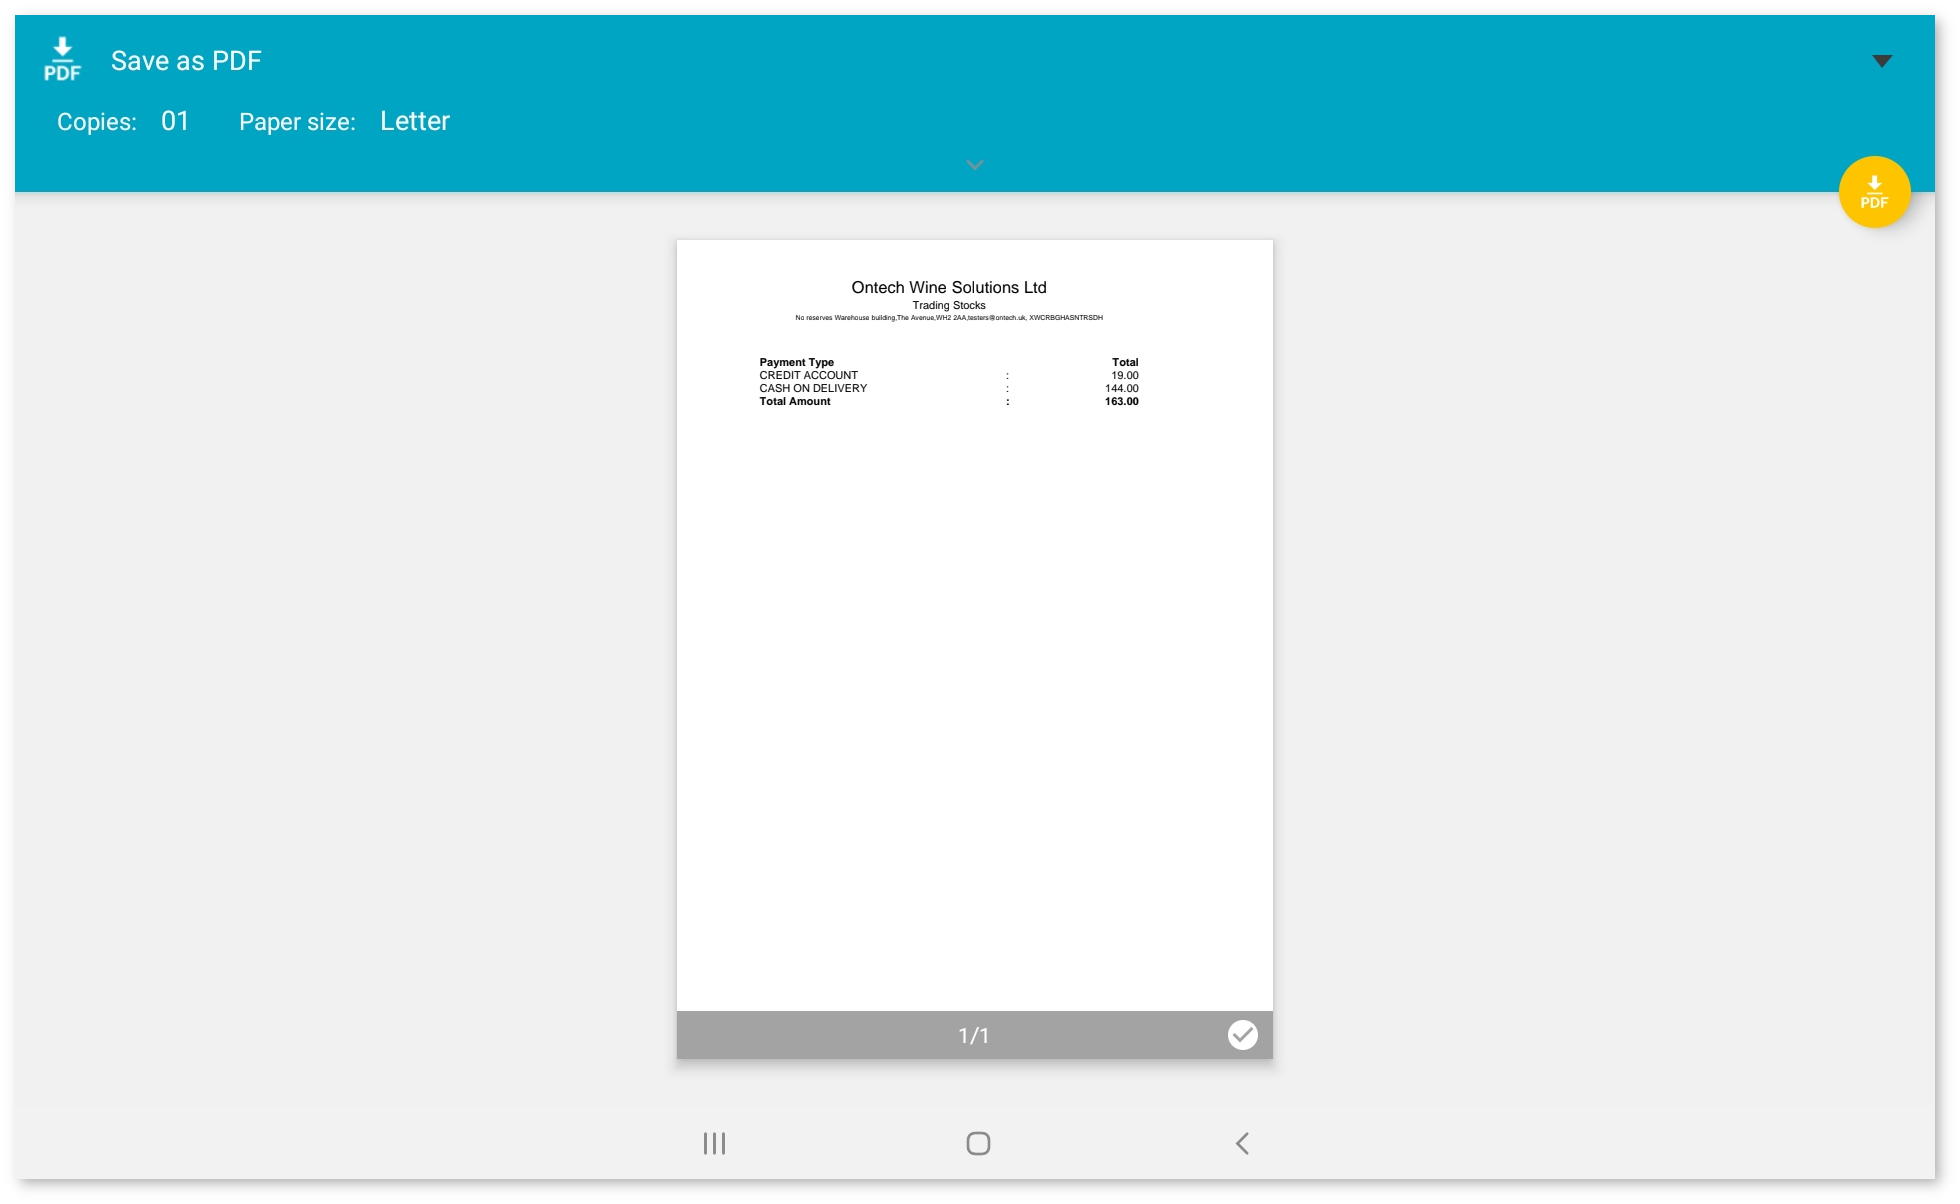
| Info |
|---|
The opening balance can be set in the ‘Config’ tab by selecting Local Drawer Attached > Opening balance. |
Replen stock
Replenish/restock shop stock from another warehouse, this creates a transfer request from the selected warehouse to the shop by displaying products sold throughout the day and their quantities. Users can edit these quantities or remove products completely before saving the order.
Options
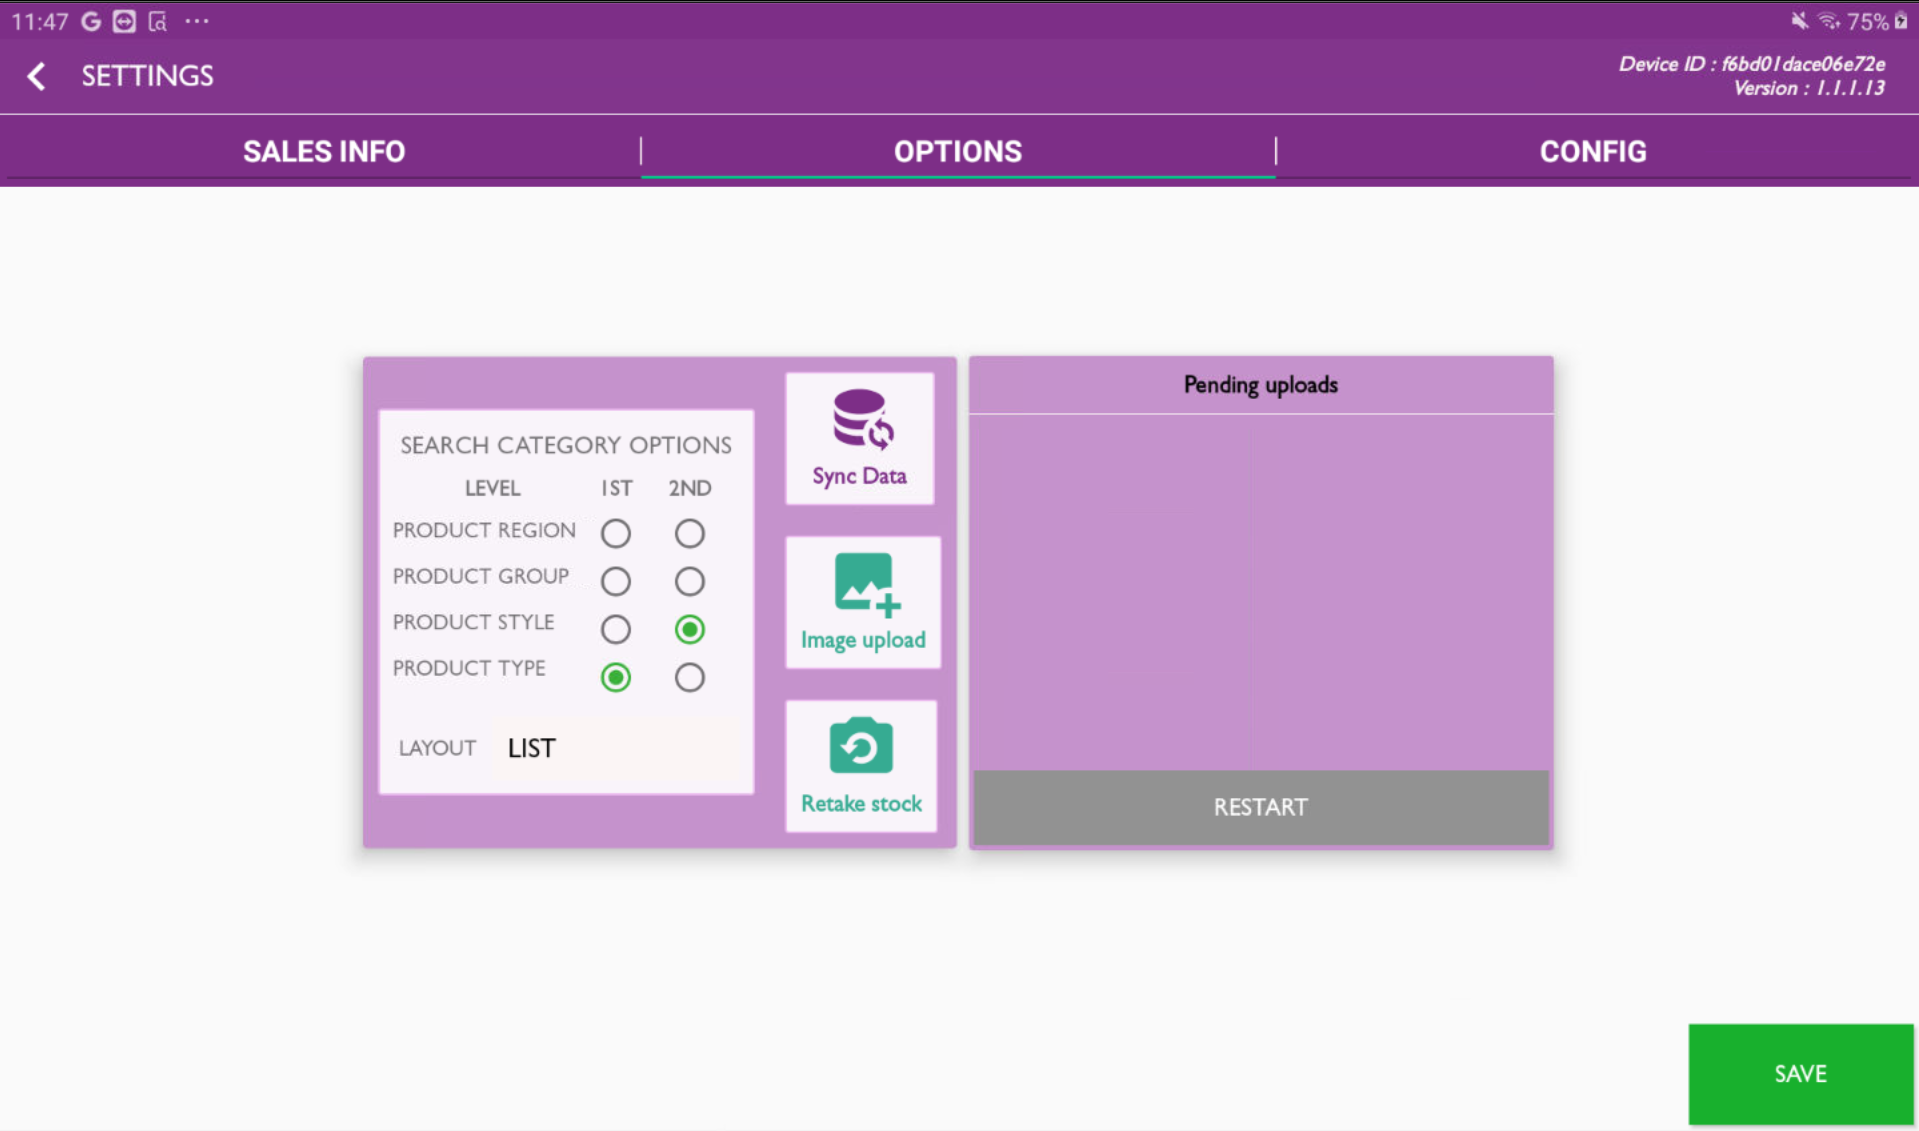
Search category options
Defines how your products are displayed in the sales screen. When using a barcode scanner the display of products is irrelevant as you simply scan and the product is added to the sale. In all other cases users have to find the product, as there can be many we group them into 2x categories and here you can define those two categories according to your preference.
So for example if you want users to first select the product type followed by the product style to see all matching products, then Product Type would have ‘1st’ selected, and Product Style would have ‘2nd’ selected.
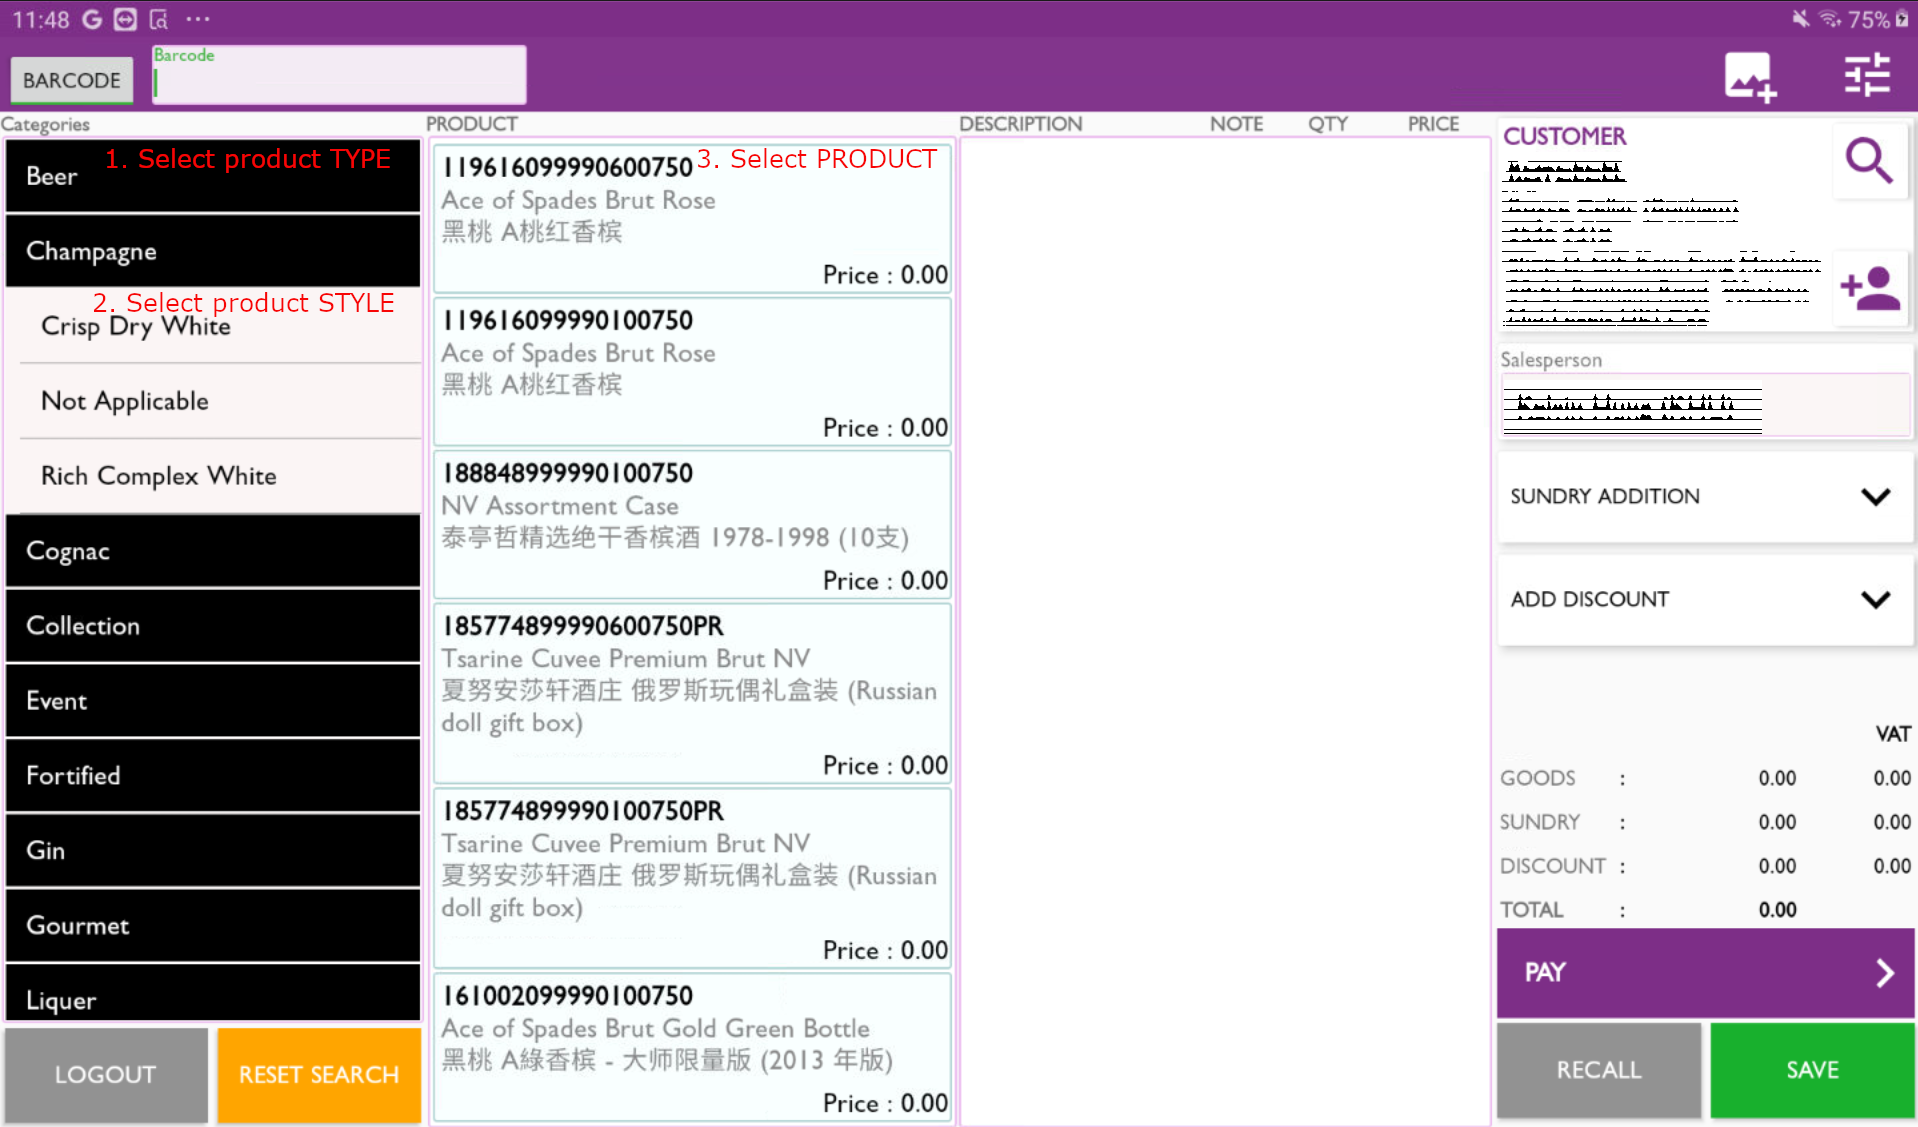
Layout
Defines if the products are shown in a list or grid format in the sales screen. In the example above products are shown as a ‘List’, below you can see them as a ‘Grid’
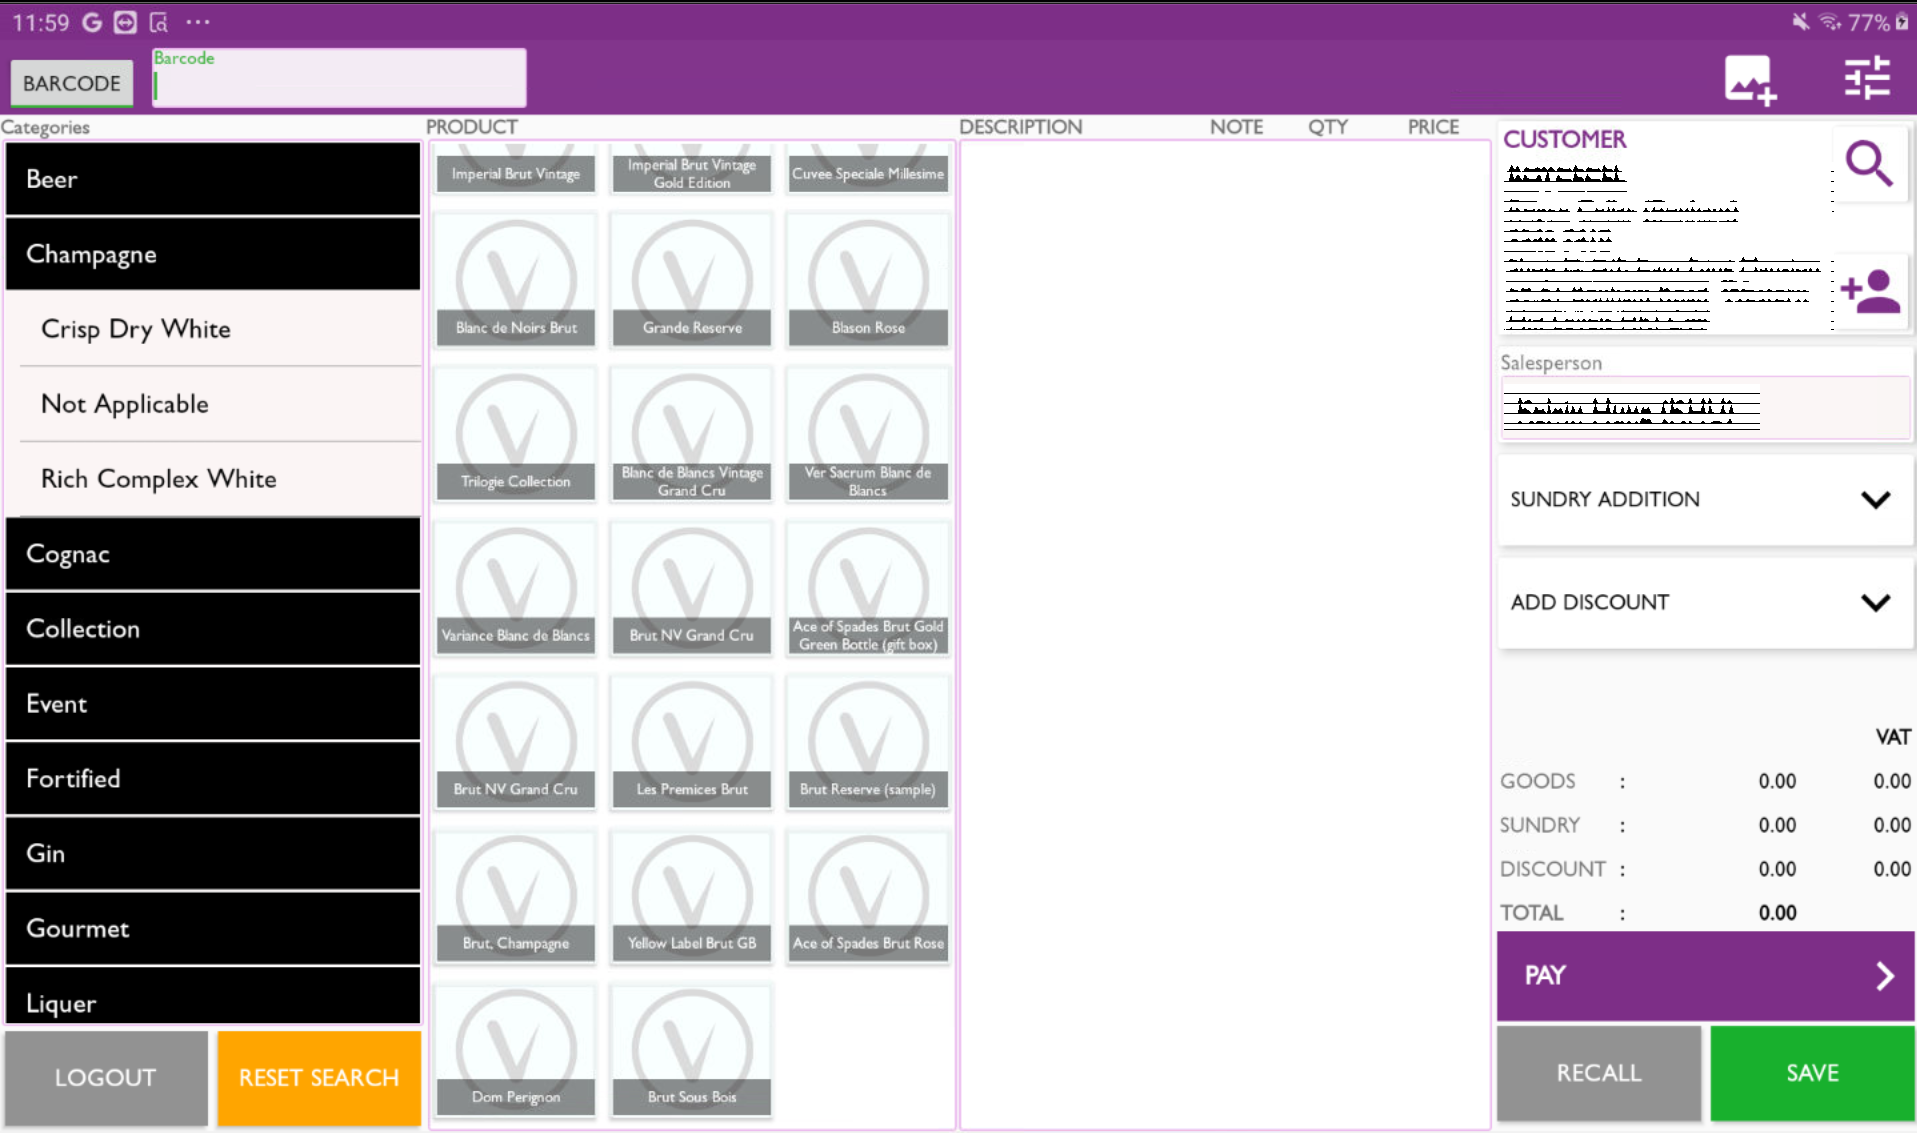
| Info |
|---|
The product images will be displayed instead if available. |
Sync Data
Forces Horizon to get the latest information from Commerce.
Quick sync - will retrieve new data created in Commerce since the last sync only.
Complete sync - will retrieve all data from Commerce.
Image upload
| Info |
|---|
This function is also available from the sales screen using the button next to ‘Settings’. |
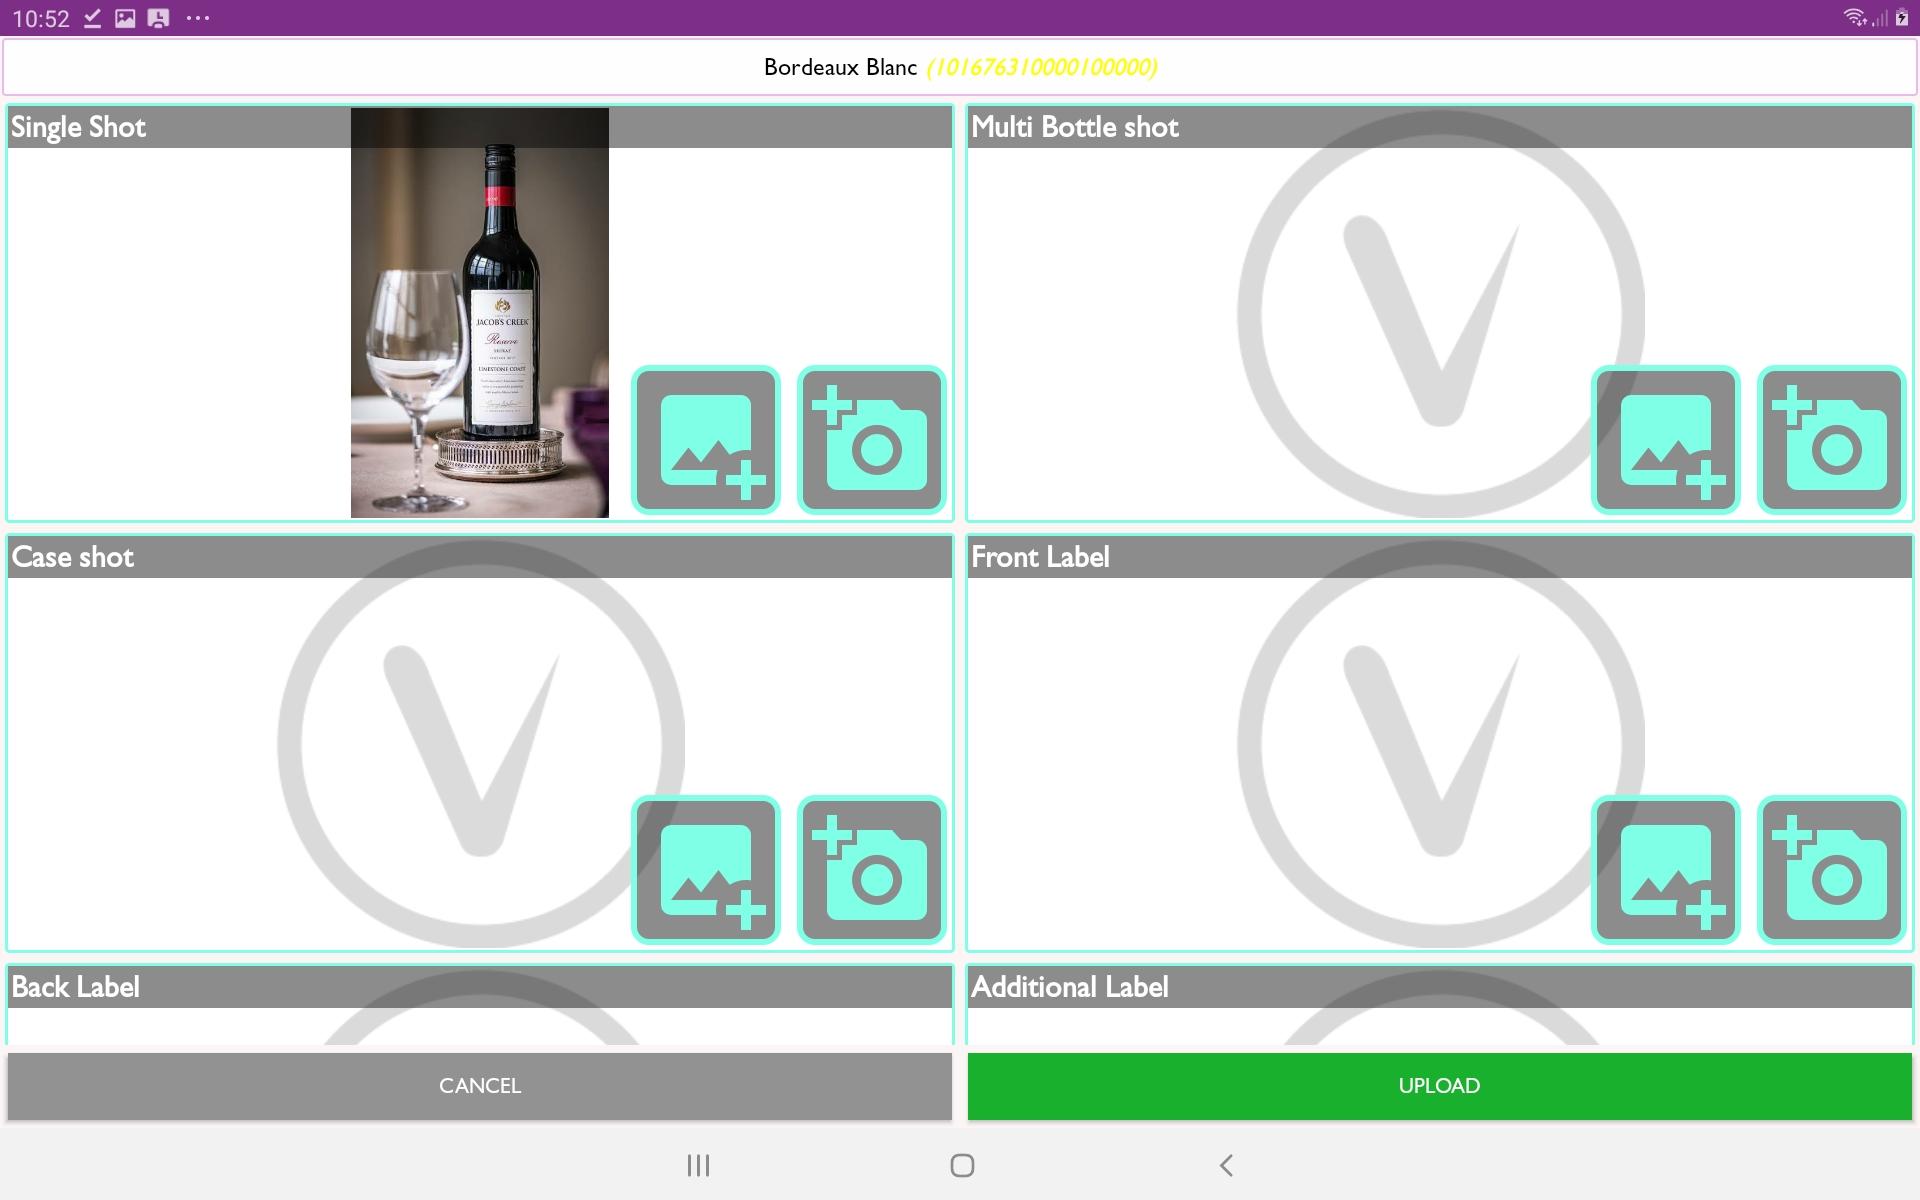
Allows users to upload/take (using the device’s camera) product images which will be automatically stored in Commerce and available in ‘Product Maintenance’. Commerce supports various image types for the products, Horizon uses the ‘Single Shot’ to display in the sales screen (only when the ‘Grid’ ‘Layout’ option is used).
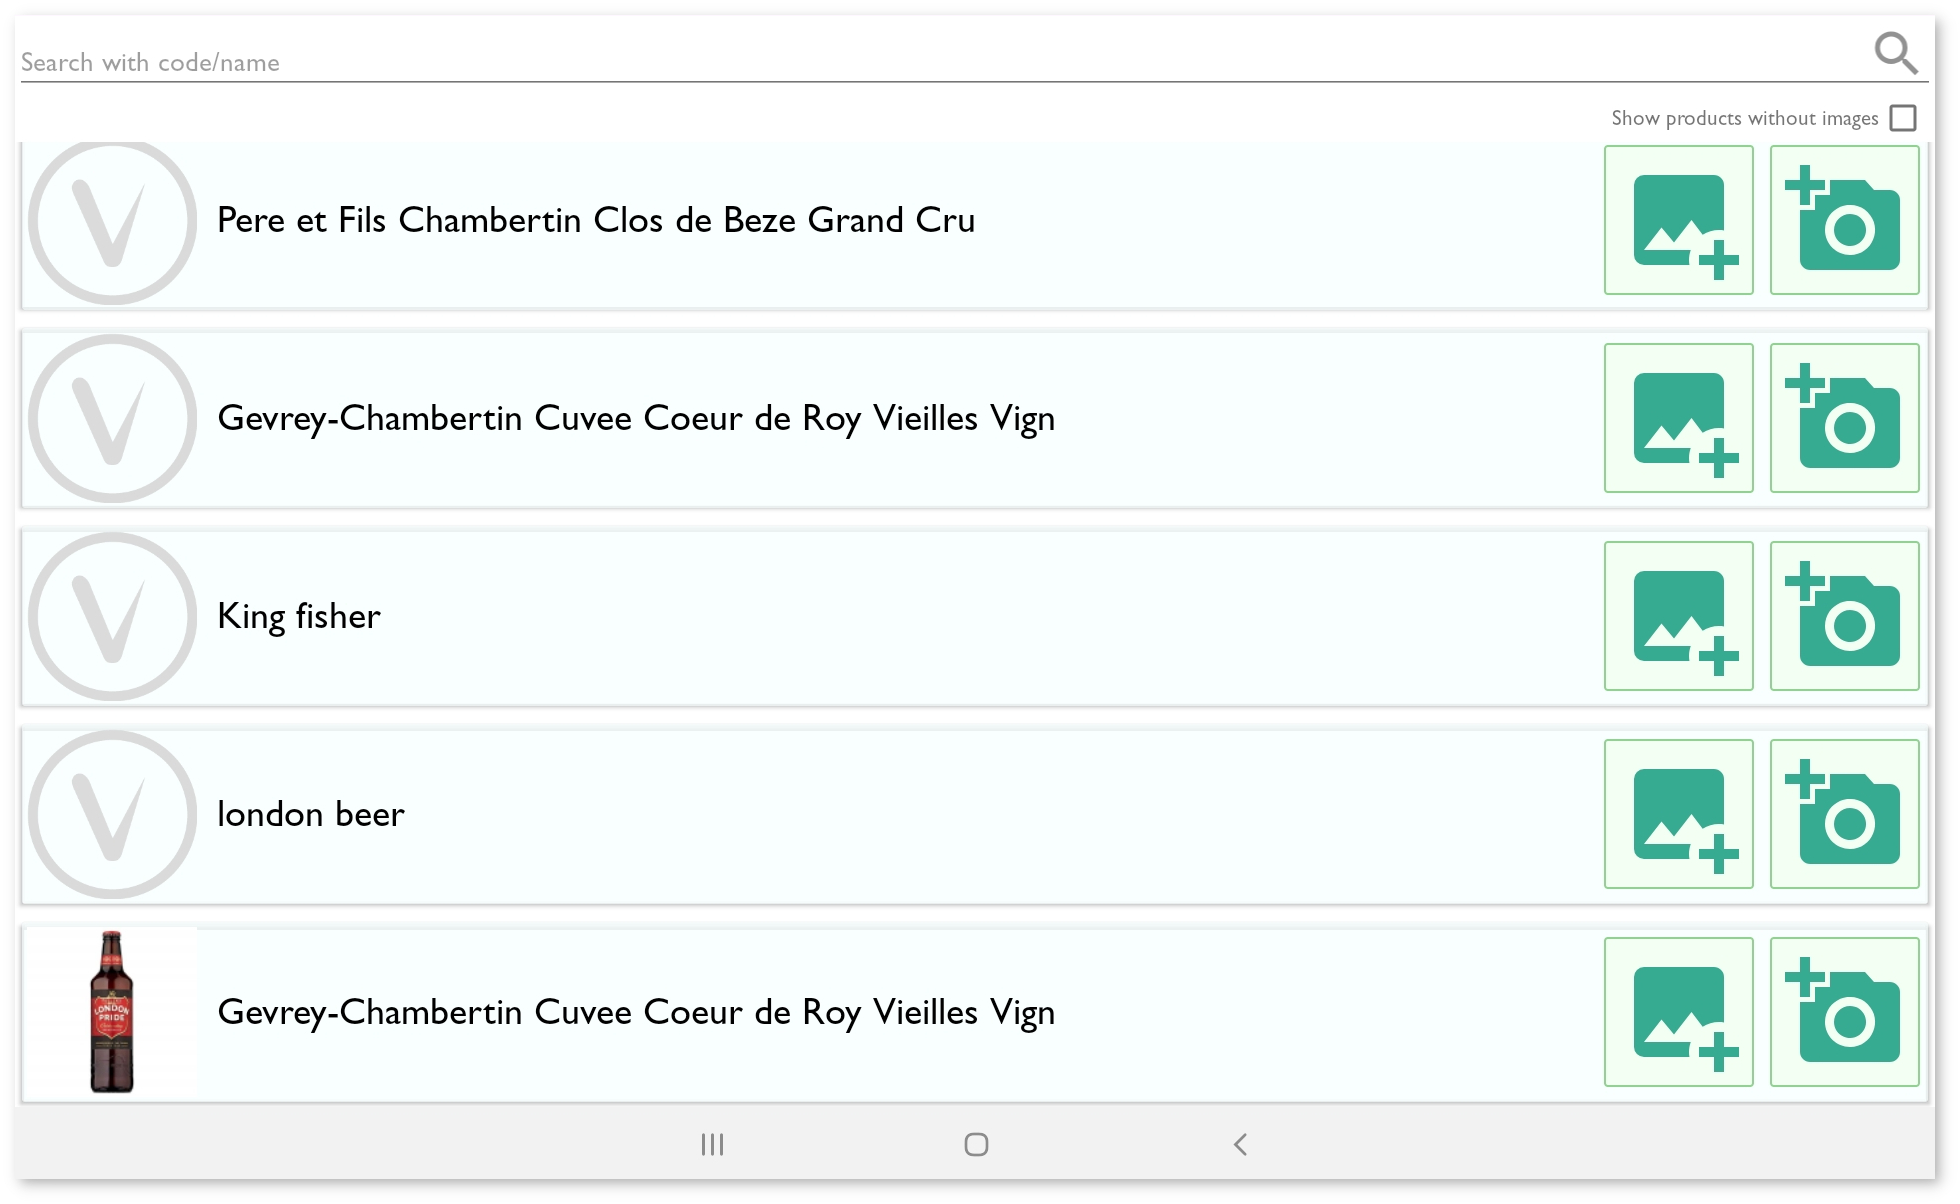
Search for a specific product using the search in the top left, or tick ‘Show products without images’ to quickly display all products needing an image.
Right side buttons (set the products ‘Single Shot’ - displayed in the sales screen)
Left green button - Upload a photo stored on your device.
Right green button - Take a photo of the product using your device’s camera.
Press the product name to upload images for other types:
Config
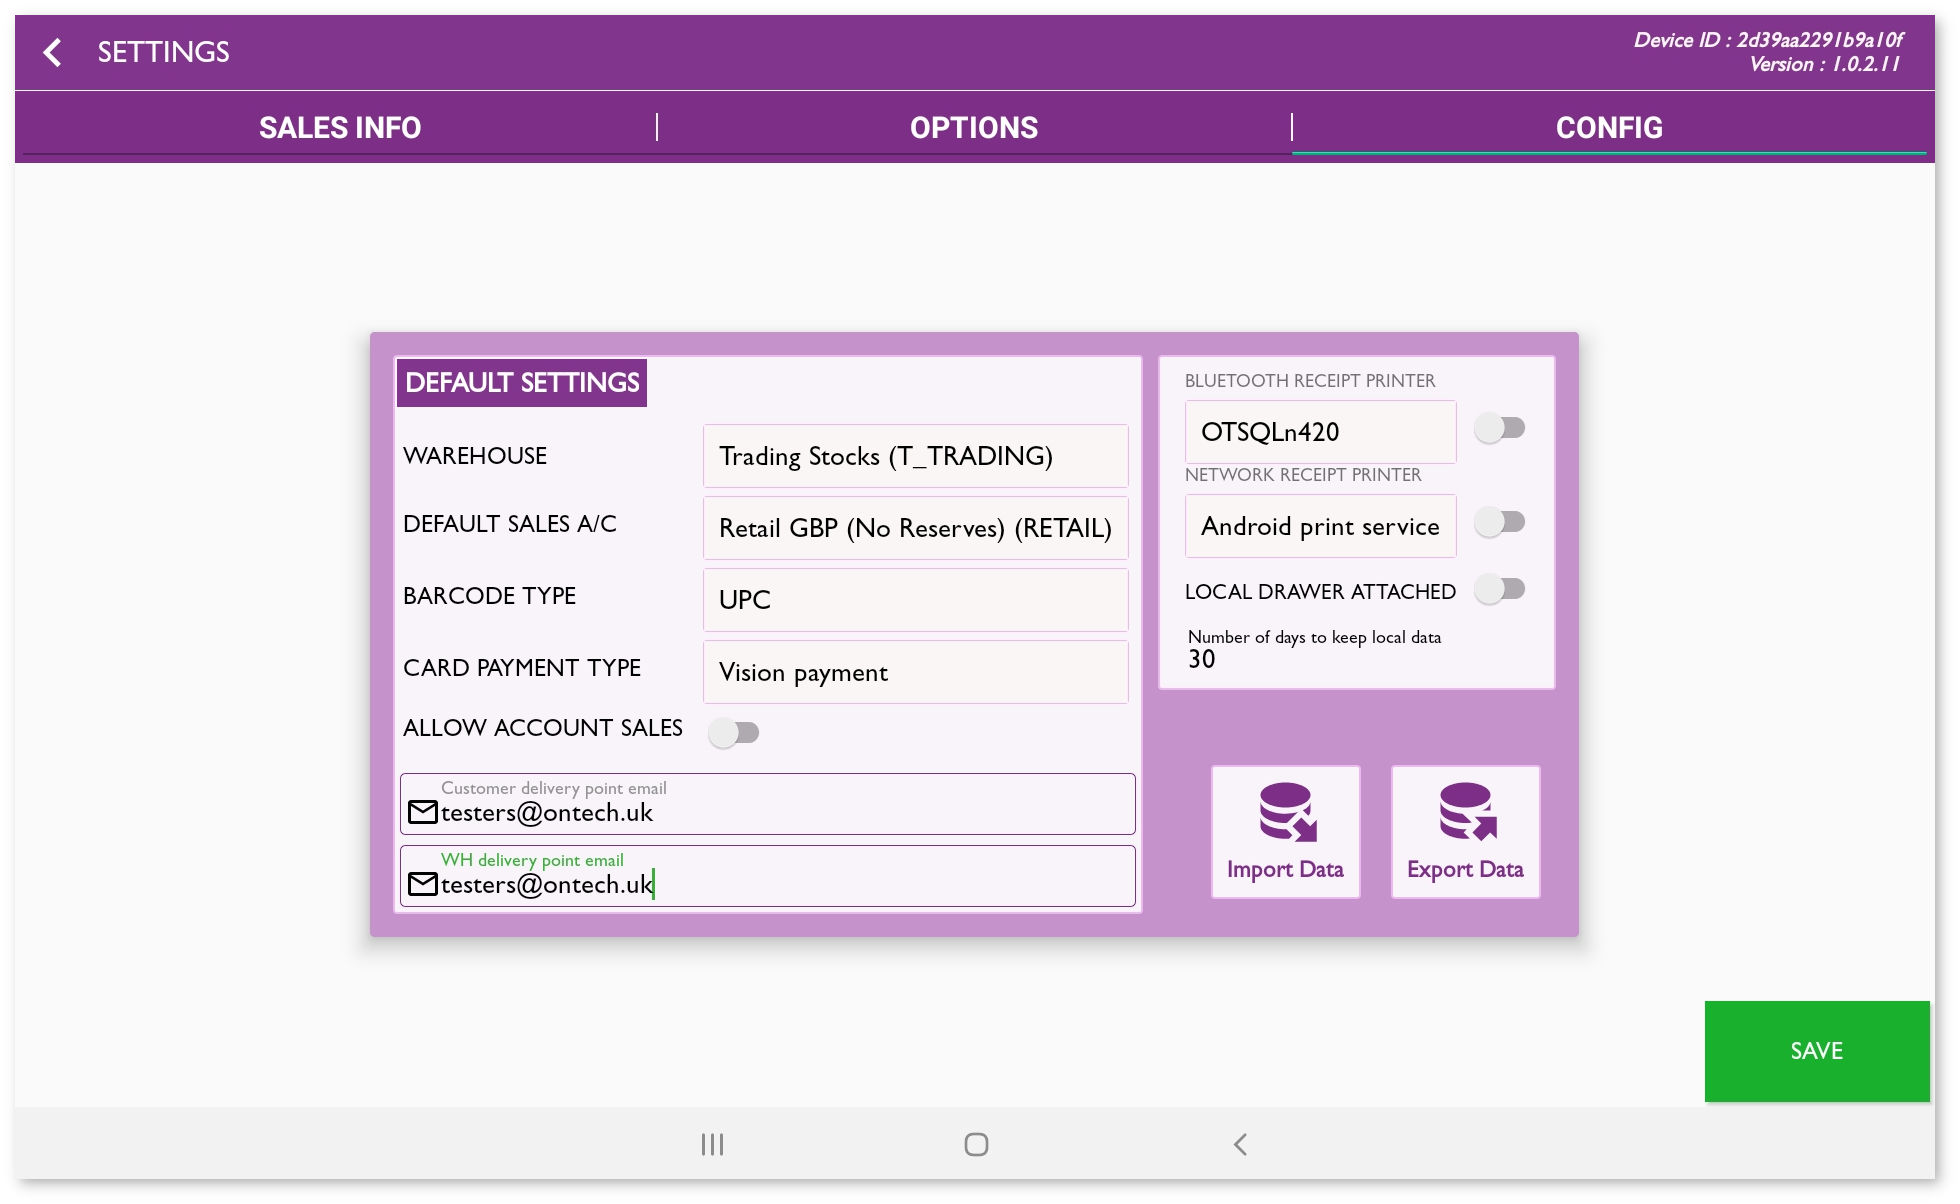
It’s imperative to setup the options here before using the software.
Field
Notes
Warehouse
The ‘Warehouse’ in Commerce where the shop's stocks are controlled.
Default Sales A/C
The ‘Customer’ in Commerce which the shop’s sales are recorded against.
Barcode Type
Commerce holds ‘EAN’ and ‘UPC’ barcodes against the products, this setting is used to determine which one we lookup when barcode scanning in the sales screen.
Card Payment Type
Swipe machine - When an external PDQ / card payment machine is used for card sales.
Vision payment - Beta option for manual entry of card information in Horizon, requires prior setup by the Vision Support team.
Allow Account Sales
Not in use.
Customer delivery point email
Shop email address. Delivery note will be sent to this address for stock orders sent to the shop.
WH delivery point email
Email address to send the stock transfer request to when stock is ordered from an alternative warehouse.
Bluetooth Receipt Printer
To use a Bluetooth receipt printer first pair it to the device, select the printer from the list and enable the toggle on the right side.
Network Receipt Printer
To use a network receipt printer first configure it in Android settings, select the printer from the list and enable the toggle on the right side.
Local Drawer Attached
If a cash drawer is attached then enable the toggle, which will also allow you to set the opening balance (displayed in the ‘Sales’ tab).
Number of days to keep local data
Sales data older than this number of days will be removed from the device. The default 30 days should be sufficient enough for Horizon to upload the sales to Commerce which are usually uploaded instantly.
‘Export Data’ to export Horizon’s data to allow you to later…
‘Import Data’ to restore Horizon’s data from an earlier ‘Export’.
| title | Sales |
|---|
Sales
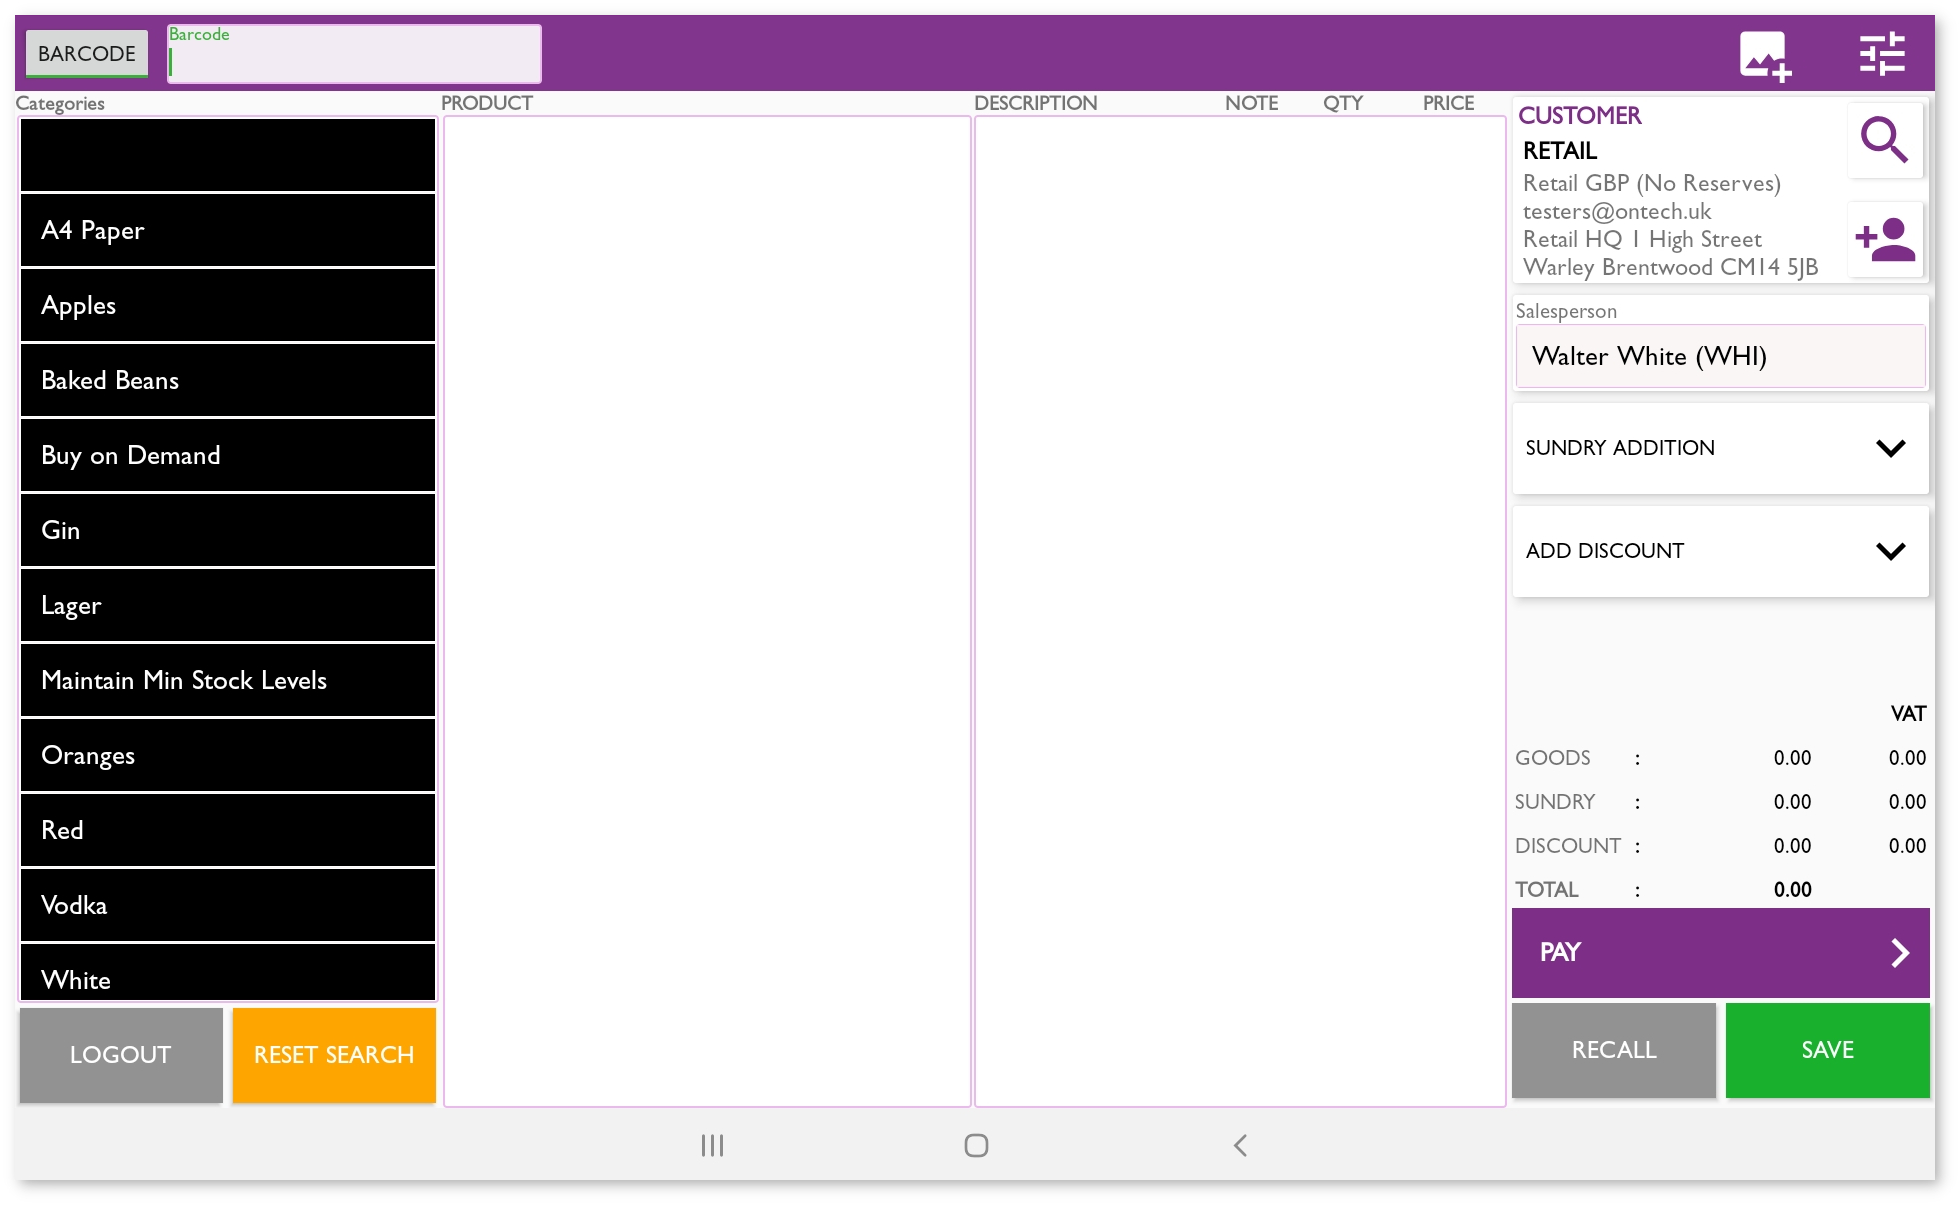
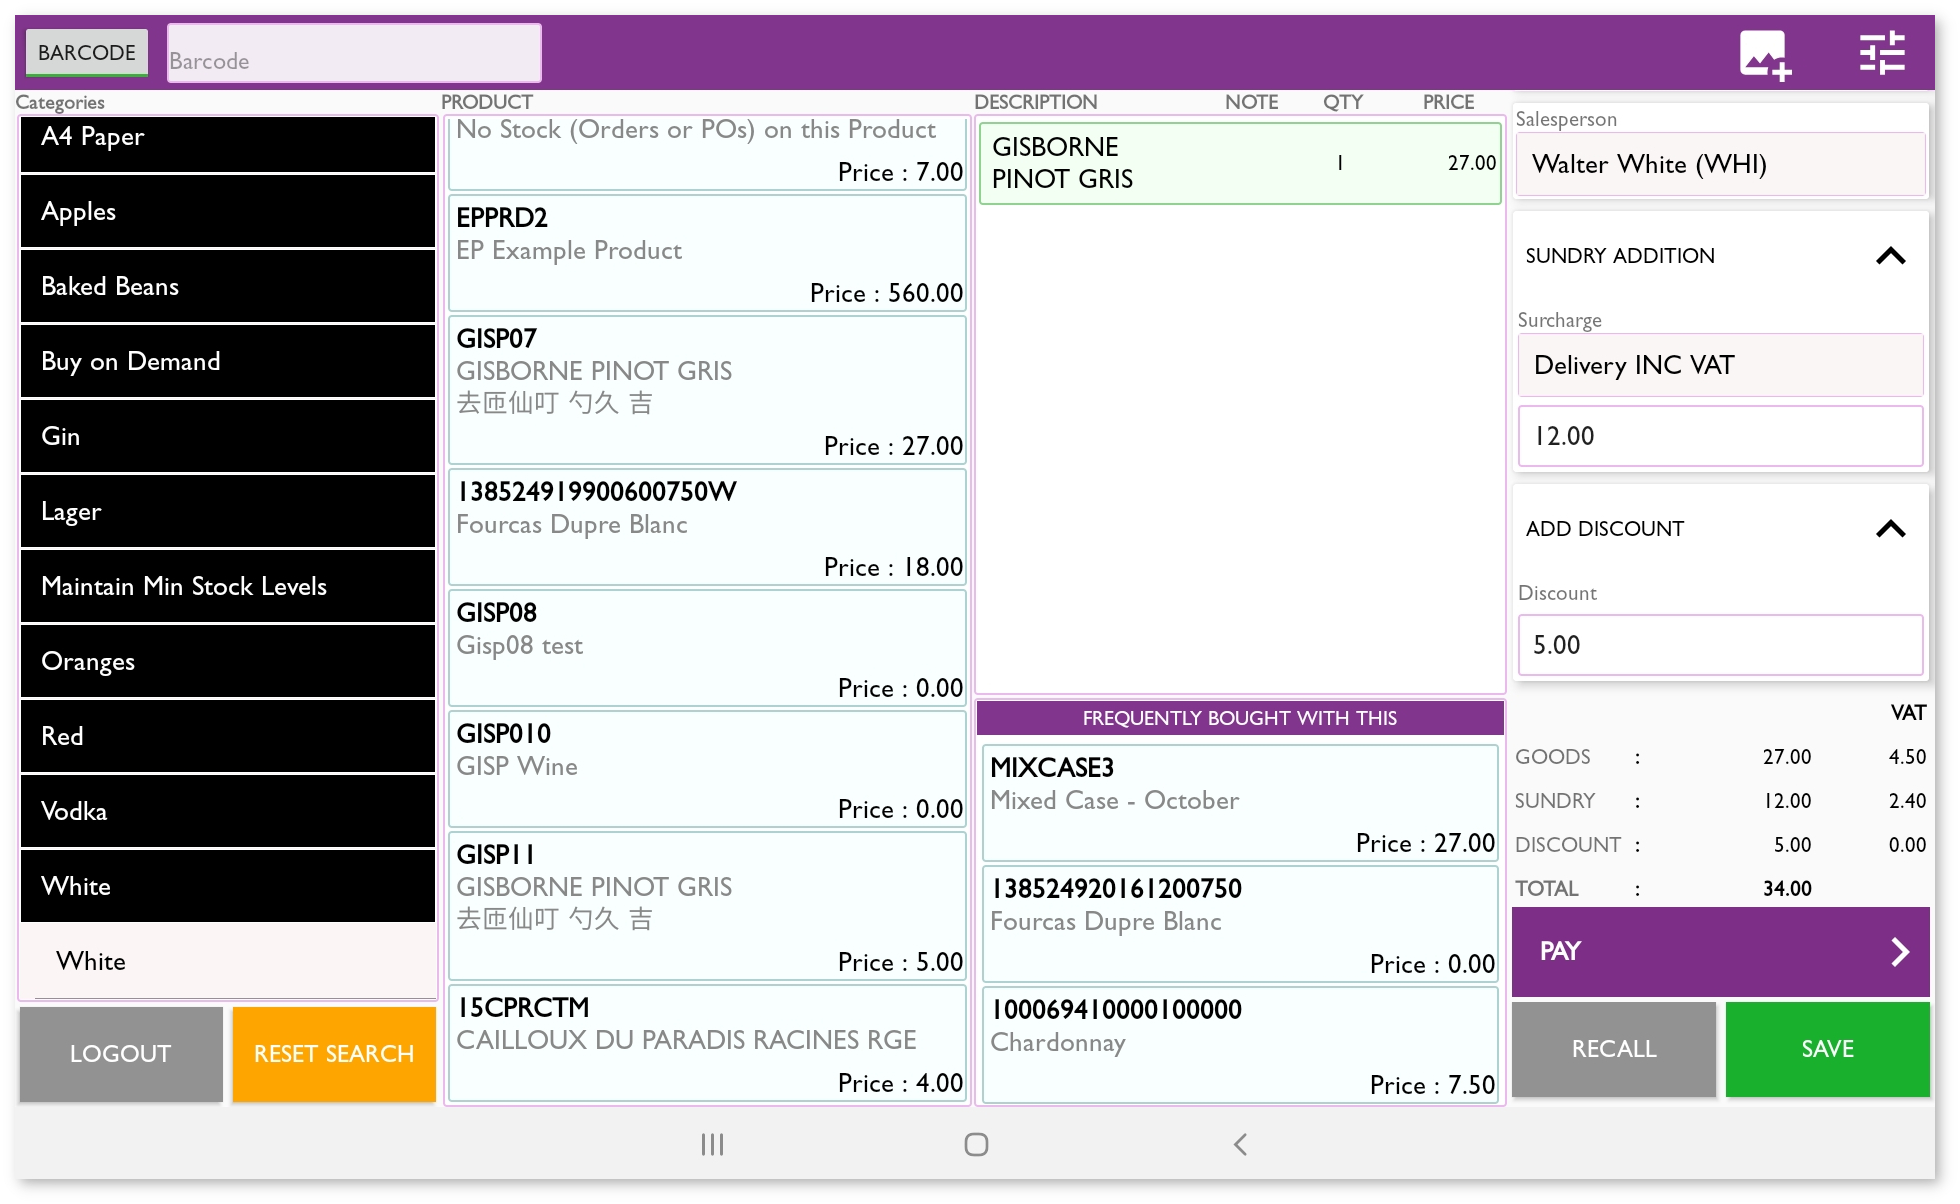
Sale entry
The screen is split into two halves, on the left the product search / entry, on the right the sale.
| Info |
|---|
The product search layout options are configured in the settings screen, products can be displayed in a list, or in a grid (product images are also displayed with this option). |
Adding items to the sale
The various ways of adding products to the sale are described below. When a product is added, the current sale prices are obtained from Commerce, if the connection is unavailable then the prices stored at login are used instead. Adding a product multiple times increments the quantity.
Scanning
Scan a product’s barcode to add it to the sale, if the barcode cannot be read it can be manually entered into the ‘Barcode’ field at the top of the screen.
Searching
Press the ‘BARCODE’ button to toggle to the ‘PRODUCT’ entry option, which allows searching by product code or description with the on-screen keyboard.
Alternatively browse by selecting one of the ‘Categories’ displayed on the left side (black) menu, where a sub-category will be displayed. Click that to display all of the matching products in the adjacent column & press the desired product to add it to the sale.
Reset Search will undo the category selections.
Non stocked items
Sales for stocked items have an order created in Commerce which is automatically allocated and delivered. If a sale is processed for an item which is not in stock in the shop’s warehouse, a Commerce order will be created but a user will have to allocate and deliver manually it.
If ‘Alternate Stock Warehouses’ are setup above and the sale has been setup to use the customer’s account, pressing the item will allow you to check for stock in the alternate warehouses and specify where the stock should come from.
Modifying the sale items
Using the third column on screen.
Remove an item
Press the item in the ‘QTY’ column use the red delete button to remove.
Modify the quantity
Press the item and use the numeric keyboard, press OK.
Modify the price
Press the item and then ‘CHANGE PRICE’ button. If the logged in user is a Manager the price can then be amended immediately, alternatively the Manager login prompt will be displayed allowing a manager to enter their credentials and amend the price on behalf of the user.
Sale options
Sale options are defined in the rightmost column.
Customer
The customer is defaulted to the account defined in the settings, this is usually a generic customer account for sales to be recorded against for the shop.
To allocate the sale to an alternate customer account, use the search button to find them in Commerce. The Commerce order created will then be recorded against the selected customer’s account.
To create a new account press the + button.
Salesperson
Commerce sales can be allocated to a a particular salesperson, this is defaulted to the customer’s Account Manager but can be overridden with the ‘Salesperson’ option on screen.
Sundry charges
Add a sundry charge to the order using the ‘SUNDRY ADDITION’ on the right side. Sundries are loaded from Commerce, alternatively users can directly enter a sundry charge value which will be added to the order total.
Discounts
Press ‘ADD DISCOUNT’ on the right side and enter a discount value to apply to the order.
Saving a sale to recall later
Often used in a bar/restaurant environment, items consumed can be added to an order and saved, recalled later, modified, repeat until finally the payment is made.
Add an item to the order and press ‘Save’, the user enters a ‘tag name’ (i.e. table number or person’s name), press OK.
Press ‘Recall’ and then select the sale to recall.
Sale payment
Press ‘PAY' on the sales entry screen to proceed to payment.
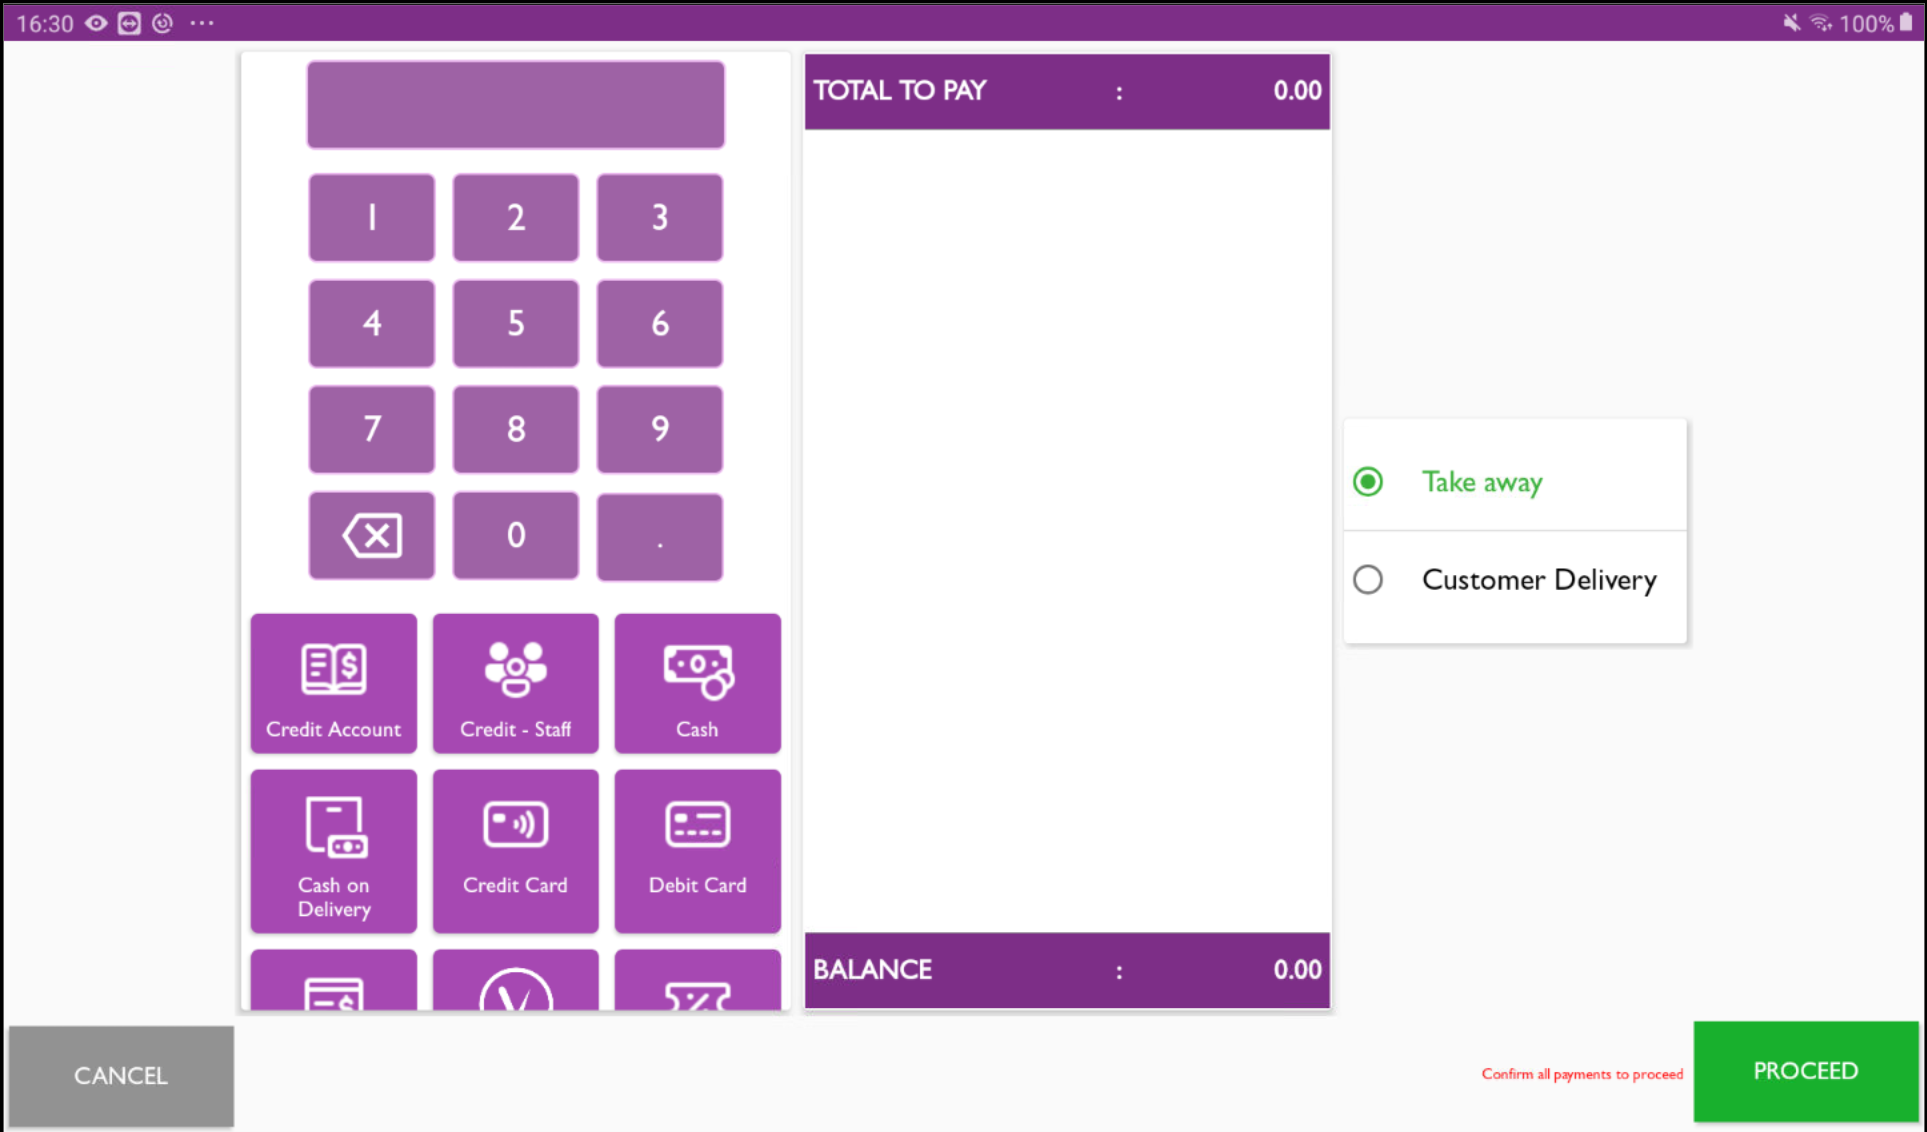
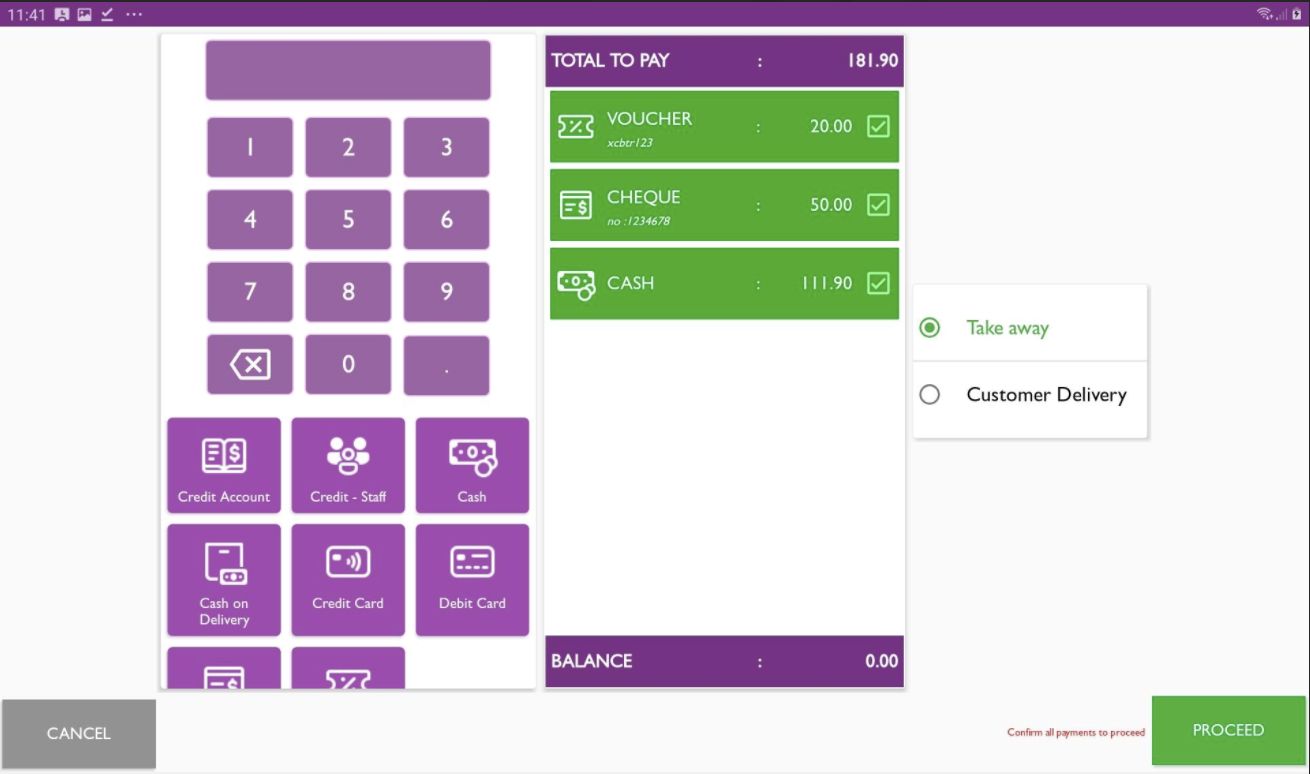
Payment methods
Enter the value
Press the selected payment method below. The method & value are added to the sale and the balance is reduced.
Repeat if required for additional payment methods (e.g. if combining ‘Voucher' with ‘Cash’ for payment)
| Info |
|---|
Some payment methods require a reference to be stored, i.e. voucher, credit card payment. Tick the box against the payment method to enter it. If you forget, you’ll be reminded when finalising the sale. |
Delivery methods
The customer will be assumed to be taking the goods now, to change to a delivery select ‘Customer delivery’ and confirm / edit their address.
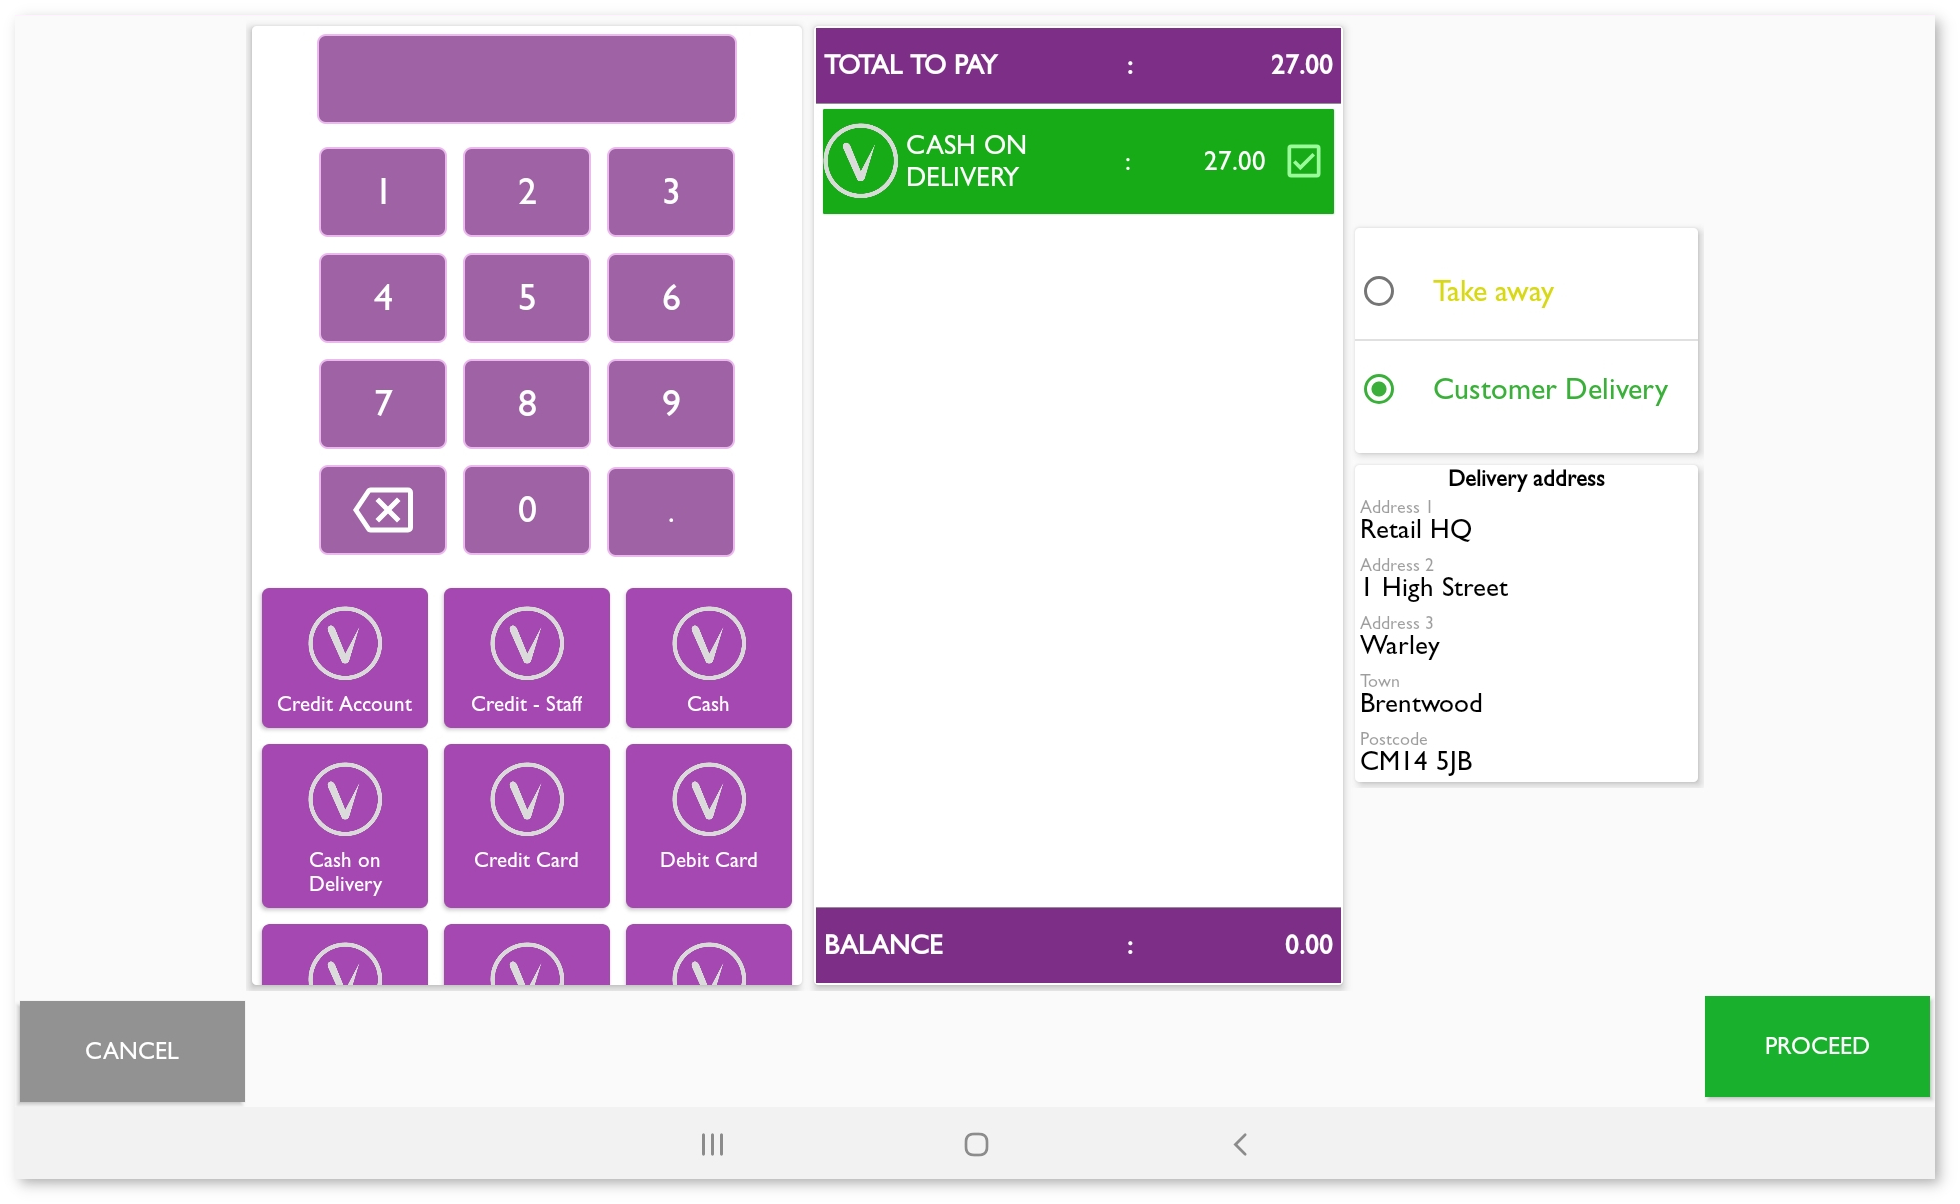
Finalise the sale
Press ‘PROCEED’ to finish the sale, this is posted to Commerce.| Child pages (Children Display) |
|---|